Wednesday, September 21, 2011

(WW) Wordless/full Wednesday - A World of Color!

First... let me get the words out. I'm changing my Wednesday title to WW. That way... when I want to be WordLESS, I can. AND! When I want to be WordFULL, I can. Simply put. That way, I have it all, because sometimes, you just want to tell the story behind it all...

And on with it:


Pow WOW!!!!

Friday, September 16, 2011

It's FEED ME FRIDAY! (Roasted Garlic Hummus Edition)

courtesy of Daphne's California Greek
Whelpers... it's kinda still warm here. And I feel like melting. But... I have a major craving for hummus. Mmm... I really don't feel like driving all the way into Riverside and eating at Daphne's "California" Greek (WHY? did they change the name like that???)

and I really do just feel like pita bread (not to be confused with PITA - pain in the ass... bread) and hummus.

I love traditional. I love roasted red pepper. I love tahini (sesame seed paste). I love it all. And I really, REALLY love garlic. (shhh... don't kiss me!)

Most of the recipes I'd found start with canned chickpeas (garbanzo beans). But... I really don't like the briny-ness. Ew! ... and besides, I have some dried ones in my pantry. Some garlic, olive oil, lemon juice, some sesame seeds and a little oregano... and I'll be good to go. Yum-O!

THIS is the recipe I'm gonna try before I do the above recipe. I'll adjust the seasonings, and tell you how it was!

And fyi (if anyone in my family Santa is keeping my list)... most of these recipes require a food processor. Yes. I have one already... but it's old and dying (it squeaks!). So... to keep things on the quiet side (my hubs sleeps during the day, and heck! I'd like to totally watch my addictive television programs while I'm cooking/prepping... THIS is the food processor of my dreams!!!

It is quiet. It is quick. It is totally awesome. It has THREE! bowls (that all fit inside each other!). It has blades galore! It does everything I've ever wanted to do with food (except cook it, of course!). One disc has an adjustable blade... so YOU can adjust the thickness of a slice, should you want to...

But... it is a Williams-Sonoma exclusive. And... I can't find it anywhere else... for less than $299. Ugh.

My daughter and I love it so much... we're willing to split it as a Christmas gift together? (do I sound desperate?)

So... as I'm pulsing away with my chickpeas and garlic, I'll be fantasizing about this... and what could be... have fun! and if you try it... let me know how it was! Toodles!

Paper Hoarders Design Team Challenge: Fall Colors Challenge

It's another round of Paper Hoarders Design Team. And guess what? I didn't buy a thing... didn't open anything new... used lots of scraps and my stash...

We had to do something (anything) other than a layout, because... as you might remember, I'm on the everything DT, which means... we still can't do a layout. There's another team that does that next week. But... the challenge? "Fall ( pick 2 of the following colors and use on your project.. you CAN use   more.. red, orange, yellow, brown, gold)" And so... I picked THEM-ALL!!!! Bwahahaha!


First... I took searched my shelves for Modge Podge Glitter! Yes... I got it on clearance quite a while ago at Joann's. And it comes in quite handy... dries clear (with little flecks of gold glitter)... you'll see... keep reading and scrolling...


Then... I sponge-brushed it on 5"x4" acetate panels (2 of them)... and let it dry... and went to a tennis match (they didn't win, so I came home and worked more on my project...)
See? It's all clear now!
Then, I worked on my Gypsy a tad... typed in FALL, and found close to nothing on carts I had, so I did it myself with Storybook (loooove that cart!). NOTE: I did not weld it!!!!!  
Cut it out on Terrifically Tacky Tape (sheet)... well, what was left of it (it was 3.25"x3.25"). It ran off the edge, obliterating an "L", so I deleted 3 letters from my screen, rotated and moved the "L" to squeeze it onto the leftover bits of the sheet (improvisation at it's finest!) and cut again. Um... I programmed it to cut it 2x. HOWEVER... cutting through sheets of plastic like this... even at high pressure, I probably should've gone a 3rd time... so I had to do a bit of careful separating... my fave thing to do...
Now... here's the really CAREFUL part. I outlined (on white paper... the one I used as a mat while I Modge-Podged them) the area of the acetate. Then... I centered lines, so the placement of my letters would be just that... CENTERED!
Then, I super duper carefully peeled the white backing off my letters, and placed them on the acetate, beginning with the center letters, then adding the others to achieve this...
and carefully peeled off the red plastic coating to get THIS... (another note... I placed the white paper underneath ALSO so that bits of things wouldn't cling to the acetate... I hate when that happens...)
Then... added a little burnt orange ProvoCraft glitter (thanks to goodness to clearance sales from years ago... twenty-five cents keeps on going!!!)... to achieve THIS. (it'd'n't purtee?)
I had already cut out an aperture in a card blank (craft! one of my FAVES!!!), large enough for my acetate. (btw... I can't find the pics of these steps... sorry...) I adhered the non-FALL acetate to the underside of the card opening, sprinkled in some punched out apples and leaves from various scraps, put adhesive around the edges of that acetate (be sure to adhere the complete perimeter, so that whatever you're putting in your shaker-box doesn't escape through an itty-bitty opening!!!), lined up my FALL acetate, and pushed it down. 
Then I finished it up, by inking the framed portion of the card with Cat's Eye gold ink...
... tied a strip of twine (recycled from a kids' toy packaging! be sure to check out the awesome extras that come with your kids' toys!!!! [this held HAIR on a Barbie-type doll!] you'll be amazed at what you paid for and are throwing away!!!) around the card's "spine"... and found these two little leaves (yes... I only had TWO!), pierced a hole in them with a piercer... threaded the twine through and knotted it from behind... 
Really... I am super happy with the total result. You have to look "beyond" the pictures, actually look "through" them to see the full thing. I loved the idea! (it wasn't my original one, but... um... I didn't think know that E6000 eats through Styrofoam [maybe I should've saved and read the packaging?], and so that particular project died on my table... literally... it shrivelled up and d.i.e.d.!)
My 17yo loves it so much... she wants it. Hmm... let's see what I can get her to do for it... Bwahahaha!
Thanks for stopping by... and if you'd like to participate in our challenge, feel free! You can visit Miss Tanya's blog and see what all the other designers have in store for you, too! Meet the challenge... do it for yourself. I had fun, and so can YOU! (and if you want to... come back later for FEED ME Friday! where you'll see something new and delicious to make [or inspire you to go out and eat...]!)

Wednesday, September 14, 2011

Friday, September 9, 2011

It's FEED ME FRIDAY! (Smoked Tri-Tip Edition)

So, we went camping last weekend, for Labor Day... it was a grand weekend. and full of food. But we did something different this time...

We smoked some meats BEFORE we went!

We did tri-tip and pork ribs. The ribs used my special rub, click HERE for the post and recipe. And the tri-tip? I called my momma for that one.

She uses:

for the marinade...
1/4 c. Worcestershire sauce
1 c. soy sauce
1 bunch green onions, sliced (just the green part)
and for the rub... (poke holes in the meat and rub it in)
black pepper
garlic salt

And... like I always do... I adjusted it just a little:
for the marinade...
1/4 c. Worcestershire (Lea and Perrin's ROCKS!)
1 c. LITE soy sauce (Kikkoman's makes the very best)
1 bunch green onions, sliced (the whole flippin' thing)
4 cloves garlic (pressed or minced finely)
a pinch of ground cayenne pepper (for that little oomph!)
for the rub... (I don't have garlic salt, and wasn't about to buy any)
garlic powder
kosher salt
freshly ground pepper...
I mixed it all up, and rubbed the stuff WAY into the meat, massaging it throughout. I decided NOT to poke holes, as I didn't want any other "openings" for the moisture to get out later in the process... then... I put that puppy into a gallon Ziploc, poured in the marinade, threw it in the fridge, and flipped it over every coupla hours...

Hubs got the grill/smoker thingy going the next a.m. and we tossed it in there, along with some hickory chips. Mmm... boy! did that smell good. Smoked it for about 4 hours, basting it, when water was being added to the water bowl.

Anywhoo... here's the end result:
And when it was sliced:
Makes the best sandwiches... EVER!

Also, it makes for a much easier campout, with the meat done and everything... Woohoo! Means more time for PLAY!
Hope ya'll have a great weekend!

Paper Hoarders Challenges! Back-to-School with a RULER Layout!

It's Paper Hoarders Design Team Day... and the Challenge? Back-to-School!!! Woohoo! Yes, the kids went back to school earlier last month, and I took time to take a pic. And since my Senior won't let me take one in front of the school anymore, I snatched this pic while she was in the car about ready to step out. Unfortunately, it didn't make it into the layout, as... if you know about my incident with Walgreens last time (if you don't, you can read about it HERE), I sent away for MAILED pics... Snapfish is my friend this week (hopefully!), and they are on the way.

So, anywho... the challenge had to be back to school and contain a ruler. Wow! I had ruler paper (Little Yellow Bicycle has a great line that has rulers in it...), I had ruler ribbon (dunno where THAT came from, but I have it!), had some stamps (woohoo!), and I had a GREAT FANTASTICAL embossing ruler border from ProvoCraft for the Cuttlebug. Can you guess which one I used? Ya think? Nooo! YESSSSS!

I did!

And I inked the "top" side with Tim Holtz Walnut Stain Distress Ink (because I love it SOOOO much!), and put in 1" strips of bright yellow paper, and ran it through my trusty CB. Woohoo! added some PopDots, raising the bar (ruler, of course!)...

Then I placed it around where the pic should go (when I get it!), Wrote on the top with chalk (lo-ove chalk!), cut out SCHOOL (designing on the Gypsy - S is Hannah Montana Rockstar, and the remaining letters are HM Daddy's Girl, welded the two O's together, because I'm cool like that!), Stickled the star, and glitter-glued the school (it was on craft cardstock...), glued it all down and added chalk exclamation points.

Then... I Stickled the inner star (from the "S"), Stickled the letters of the high school and "Seniors"... and wrote in WHITE gel pen the "Class of 2012". Easy peasy pudding and pie... it's so easy I made myself cry!

And I love it! I can't wait for the photo to come in and put the first page in her Senior Scrapbook! and just a little FYI... when I finally DO get that pic, I just might put a little bling-bling on her head in the form of a tiara... just thinkin'!

And ya know? um... I did this LAST week, because... (see the post here!), and I'm SOOOO glad I can finally share it with you!

Join in our super fun fun fun and go to Tanya's Blog, check out the LAYOUT DT's shtuffs and link up to participate in the challenge! Woohoo! And then... come back again NEXT week to see what more wonderful things we've all come up with!

Wednesday, September 7, 2011

Wordless Wednesday - Doggy Barky Beach!

This last weekend was Labor Day Weekend!

Traditionally, we go to the beach on the Sunday before the actual Labor Day itself...


But this year, we had an additional family member and had to change our plans... just a little!

For our first excursion like this... We all did pretty good. It was a big bark in the park!

Just as a reminder, if you'd like to join in the fun of Wordless Wednesday, please go to Two of a Kind Working on a Full House and link up there AND! the HQ of Wordless Wednesday!!! And don't forget to comment. As much as we love for you to look at the shtuffs we share... we also like to know you were here and what you have to say! Share your thoughts... we LOVE it!

Thursday, September 1, 2011

Paper Hoarders Design Team Challenge: Back-to-School (with a RULER)

Ok... so... the first post I did (which you WON'T see until next week) was a layout. And why won't you see it... yet? Because, I'm a total nerd/dork/goober, whatever you wanna call it and didn't even think that I couldn't make a layout. Why not? Because I am on the everything BUT a layout team. That team does it next week. Dweebie me! and so... I killed two birds in one night.

Throwing an idea together... I didn't want to do a card. Everyone was already doing cards, and I wanted to be a little different, plus... my fabulous idea (see next week's post!) kept glued to my head.

Now, bear with me, as Blogger won't seem to let me finish uploading photos, but if (I'll keep trying throughout the day!) it'll let me finish without kicking me out, they'll all be up before you know it.

And so... I ran from Back-to-School Night (at the high school), because yeah... we've been in school for 3 weeks now... to Walmart. Try to look for a wooden ruler there... NOT! because they just plain don't have any...

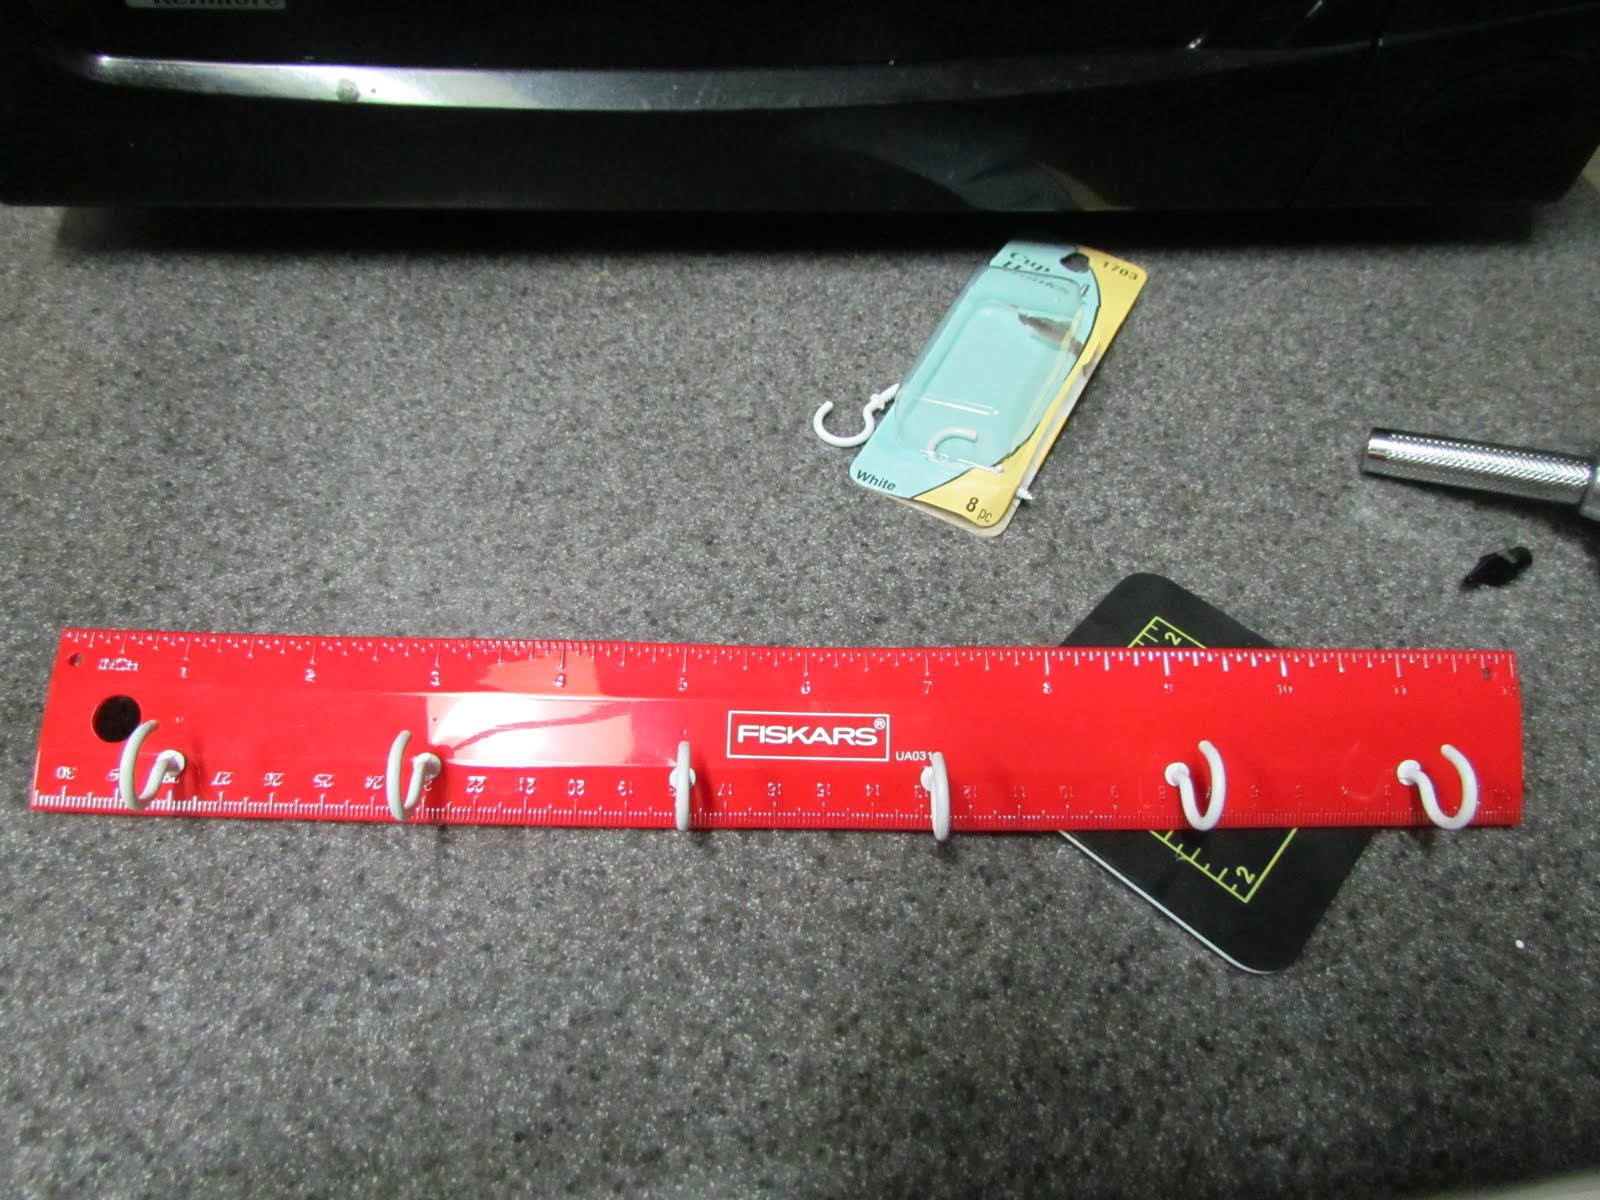
So... I got this super flimsy plastic ruler from Fiskars. Red, for the apples... I looked for green, but no such luck... WHY? Probably because that's what I'd set in my mind...
and I used my Silent Setter to punch holes in it. Teeny tiny holes so I could thread these white cup hooks in... (starting at the 1" mark and continuing at the odd inch marks... there's 6 in total)
Then I punched holes in the upper corners using my Big Bite!
See? and my husband said I needed to use a drill... um... I guess he doesn't understand MY kinda toys... uh, huh...

Threaded simple yellow ribbon through...

Cut out "WELCOME" in Plantin' School Book (in black card stock) and added a little chalky-chalky...

Added some black-backed (had to, on account a the ruler was already red... spoilin' ma plans!!!) red ripe shiny apples (used Colorbok shiny paper for these!) with a couple of little green leaves, and

Voila!

The teach now has an awesome little hanger for hall passes, office passes, keys, etc.

I'm sure she'll just love it! Hope you do, too!

And if you'd like to join in the fun-ee-oh!, swing by Miss Tanya's blog and she's got a little line-up going for you. Don't forget to do the challenge yourself... we all had fun doing it!

***Woohoo! The pics are all finally up... just a little add-on here...
To do the chalk letters, I kept them on an older mat and chalked them while still on the mat (after taking off the negative paper), makes it MUCH more easier.  Also, I realized I forgot to add that I cut a strip of craft paper, painted it blue, then the edges green and fastened it on in orange eyelets. Thank goodness the Big Bite goes through this stuff!!!