Wow! Time sure does seem to go fast. It seems like yesterday I posted things on Last Minute Gifts... Only, that was a couple of weeks ago. Christmas has come and gone... my ten-year-old-soon-to-be-eleven-year-old is already counting down the days until next Christmas... and yesterday was New Year's! Welcome to 2016!!! and...
Welcome to the Ringing in the New Year Blog Hop!
This blog is meant to inspire you to... just get started! Craft for the New Year! Do whatever your heart desires! You'll see lots of crafters in this hop, and lots of different things to be done. Some may even have blog candy. So, if you've come here from
Lori's blog, that's great! Just follow along... If you "just happened" here
because you love me SOOOO much and absolutely missed me and needed to start your New Year with me, that's great too! If it's the latter, feel free to start at the beginning (where the GP [
that's code for Grand Prize] is) on
Lisa's blog duh... I know it's not me. It's the "other" Lisa... get over it where she's sure to fill you in.
Just some quickie rules...
- You must comment on each blog to be eligible for the prize.
- You must have fun while you're doing all this.
- You can choose to follow or subscribe to some of our creative people.
- And did I say you should have a good time?
That's it. Simple enough, right? Right! So, on with the project(s)
because you know I actually did kinda sorta more than one this time, right?
While everyone else was texting and posting
and screaming and drinking and sleeping and... and... for the HAPPY NEW YEAR, I was
as I do every year... wishing my middle daughter a HAPPY BIRTHDAY! Yep. She was born on January 1st. 22. Years. Ago.
Yep, I'm that old or that young, depending on your perspective. And so... every year, I make a card
or try to... depending on my laziness meter reading and this year I wasn't too terribly lazy to make a card. so HA!
Since it's been all holi-dazy around here, I've got some songs on my mind. And every song seems to fit into what I'm doing, like typing this entry right now. So...
"Let's start at the very beginning. {dink dink} A very good place to start. When you read you begin with A-B-C." When you craft you begin with...
Yeah... I don't know either. Just thought I'd try...
But in this case, I started with the Cricut Design Space's "Make It Now"
only, I didn't "Make It Now". I customized it... and saved it for a while... and worked on it some more because I have absolutely no patience with a computer that keeps freezing. And yes. I know it was my laptop, because it all worked fine on my phone and iPad. So whatever. But I was totally too lazy beside the fact that the freezing wouldn't allow me to save it...
And so... this is the
starting at the very beginning {dink dink} base idea...
Except it cost $4.99.
And for those of you that really truly know me (or have it already figured out), I wasn't going to pay that much for one design cut. I like free. Free is good.
Except that my "free" isn't always really and truly "free", since I do pay for a subscription. But this one cost... until... I unattached items, and pulled it apart, and found out the
font is what cost. Everything else I already had through the subscription. (In case you haven't figured it out yet... the subscription is totally worth it!) I yanked out each and every one of those letters.
I didn't like that font any way! I switched in a different font, changed all the layers to the same
exact color.
My dang computer kept freezing!!! Otherwise, I would've just pulled them down into each other and attached synced them. I also added a handful more pennant flags. Then I duplicated all the elements three times (I have 3 adult female birthdays... all daughters... from January 1 through February 15. And I am always determined to make them equal!) and put in letters for each of the girl's names.
Going to cut. Design Space put all the letters up into strips... with a block and a couple of strips. Nuh, uh. We
(me, myself, and I) don't play that. We
(me, myself, and I) are complete
hoarders, tree huggers, paper savers. I moved (from the cut screen) the letters into a full block, so as to utilize a scrap of paper, rather than a 12x12. (This photo shows the suggested cut and some movement to the block.) In other words, you don't have to cut the way the program dictates. YOU can lead it!
YOU HAVE THE POWER!!!!
With all the letters cut out, the program advanced to the pennant flags.
Note to self: paper tears when the blade doesn't go all the way through the paper. Duh.*Please NOTE: Be sure to check your blade (by releasing the housing from the holder and pushing the top "button" down). If there is paper on the blade, take it off CAREFULLY. Otherwise, you will waste a
****load of paper. (Note the torn cuts in the background
and throughout these next photos.)
Here's the salvaged ones.
Yep. Gonna have to re-cut some more to make the other two cards. Sometimes planning ahead (getting those other cards done) doesn't work out so much. Maybe I'll go back to complete procrastination... They are ready to be colored
(inked... whatever words you choose. You know what I mean).
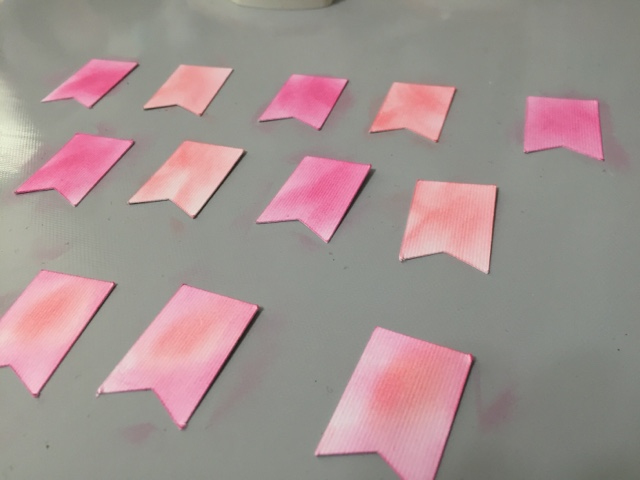
And here's the colored ones... In a simple step, I inked with two
obviously separate pink inks and a Ranger blending tool. The bottom three (for my daughter's name), I inked both inks on.
Doesn't it just make you totally hungry? Now I'm craving raspberry sherbet!
And those of you who know me know I like a little distressing... so, I used one of the
trashed! for shame! NOTHING, NOTHING is ever "trash" in a craftroom!!! torn pennant flags to test various different Distress Inks. I went with the top right corner. Antique Linen for the win! (Sorry for the blur...)
I don't know about you, but sometimes I really
hate... 4-letter word! dislike penning a wet adhesive on very small letters. So, I used my Xyron X. Love it. I am such a pincher, I try to make sure I use as much of the sticky as possible, but try not to have the letters overlap. I use tweezers or a craft knife to push the letters to the proper position, before pulling down the sticker tape.
Btw... pink is SOOOO not my favorite color, but that's what was available for the machine back in the day... yuck.
It comes out like this. See all the bubbles? Burnish them HARD with your finger. Rub it all over.
And it still won't be enough...
Now, take a pen or a fairly sharp pencil and draw around each letter, through all the openings, too.
Note the "P"... I did not write in the opening of the "P", and caused little glue boogers/snot. Yuck. Nobody wants that. Press hard. Do it twice if you didn't feel the contact with the opaque paper underneath.
Peel off the sticky top. And now you should have stickers with no gluey bits about them. Gorgeous! Place each sticker on its corresponding pennant flag
(picture not included) and get ready to glue.
If you've read my blog before, you may know I love Home Depot. I buy silicon caulking on a regular basis. It is so much better
to me than pop-up foam.
Peeling off those little bits of sticker back is just SOOO not for me. It frustrates me and gets caught underneath my nails; then the little bits of backing never make it to the trash can, because when you try to put them in, they float away to the floor. Double Ugh. So, I applied a strip at the top, to hold a little pink and white baker's twine
(Have you figured out yet that my daughter's favorite color is my least favorite color? Pink. Triple Ugh.) and a dollop
of Daisy... haha... you're showing your age if you get that one... in the middle of each pennant flag. It dries clear and adds the 3-D look I was going for... I spaced them out according to the size of the card and curved them "just so". Then the twine was laid across the top, the card place on top of that
in a very reckless manner... It so totally could've gone in the wrong spot, but I was feeling dangerous in the craftroom!
And I flipped it!!!! Yay! It actually turned out okay!
Woohoo! Love it so much, Let's look at it AGAIN!
Just repeat with the other pennant flags, making the 3 banners... Only, the last banner has no 3-D.
I realized I had pretty much no space left. So... I slid it underneath. Shhh...
Next up? Um... see those loose ends? And all that
wet 3-D
caulking? Um yeah... Now we must proceed very carefully.
Solution! Cut 2 small-than-the-card-side inserts and place them inside with dry adhesive (after wrapping the loose ends of twine toward the inside) on the back. But press down VERY carefully, so as not to smoosh
(yes... that is a word. don't ask...) the
precious 3-D
architecture on the front.
And there ya have it!
But... that's not all...
See how well it's raised? Super awesome.
Then we have the gift wrap. This paper. I just love it. And it only cost a dollar at the Dollar Spot in Target!!!! But the twine...? Way too bland. And yes... this is what I totally procrastinated on... wrapping the gifts... Ugh. And I couldn't find anything that hit my fancy in my stash to replace the twine. What's a crafter to do?
Dye it!!!! I poured some of the mist into a bowl and added some drops of each of the alcohol inks and I did not realize what I thought was red was actually watermelon. Oops. and mix them up.
Put the twine in, mix it up, then bag it to
toss in the dryer dry on high for just a couple of minutes.
Make sure it's spread out and not balled up, otherwise you might send it wet and stainy, just like I did.
See how it stained my hands?
The right one's worse...
And my ten-year-old-almost-eleven-year-old insisted on painting my nails... I told her it wouldn't last. Who's right?
The color matches as close as I can get it.
And tied it in a bow!
It's still wet but... Ready to go!
You've got a card AND a wrap! And that's a wrap! Hope you enjoyed my projects and hope they inspired you to craft in the New Year.
Please don't forget to leave a comment
otherwise I just feel like I'm talking to myself on a regular basis. Oh wait! I do that, too! and visit the other blogs. Next up is
Sarah, who is sure to have some awesome inspiration, too.
Here's the full lineup, in case you get lost or would like to revisit someone. Have a fabulously crafty New Year!
1. Lisa ~
http://honeybearzdesigns2011.blogspot.com
2. Kim ~
http://katydidcards.com
3. Holli ~
http://Sunflowerholli.blogspot.com
4. Miranda ~ http://
www.nanasscrapspot.com
5. Connie ~
http://conniecancrop.blogspot.com
6. Barbara ~
http://barbarab3.blogspot.com
7. Lori ~
http://savingmine.blogspot.com/
8. Lisa F ~
http://lisaslittlerascals.blogspot.com <==== You are HERE
9. Sarah ~ http://
www.sarahbiswabic.blogspot.com <==== UP NEXT!
10. Rhonda ~
http://craftingwithblue.blogspot.com