Showing posts with label butterflies. Show all posts

Saturday, July 9, 2016

A Year of Card Techniques - (July) Watercoloring

If you are here for the Under the Sea Blog Hop, please go HERE, or you can check out all of my hops for today (there's only two!). We'd I'd love to have you!

Welcome to...

It's month seven of our year long adventure into different card-making techniques, folds and paper crafting products. We hope you got the chance to hop with us each month.It's not to late to hop and comment to be entered into our prize drawing. If you missed any of the previous months,  you can click on the month to be taken directly to the start of that month's hop.
January HERE   February HERE   March HERE   April HERE   May HERE   June HERE

This month we are playing with watercoloring and you won't want to miss the amazing and fun cards we've got for you today. We really love feedback, so please leave a comment on each of the blogs in today's hop. Each comment on the 12 hops throughout the year will be entered into a drawing for a $25 Blitsy.com or Stampin' Up gift certificate (Winner's Choice).

Now on with the projects!
I tried several types of paper... one of them being THIS (above). Watercolor Cardstock is thick and absorbs the watercolors the water fairly well but doesn't let the colors run like I wanted it to... Oh! And it curls less you know, as papers tend to do when they get hot or wet...
 
 This is just a tidbit (nothing really related to the post)... Um... What's up with THIS, Ranger? I bought two of the same color inks not because I didn't know what I had! as the name is the same, but the color tone on the cover is different. Guess what? They're the same flippin' color. Buyer beware!
I have many Distress Inks... and thought I'd try some watercolor inks as well. I think I like the Distress Inks WAY better for the blotting effect. You'll see as you get closer.
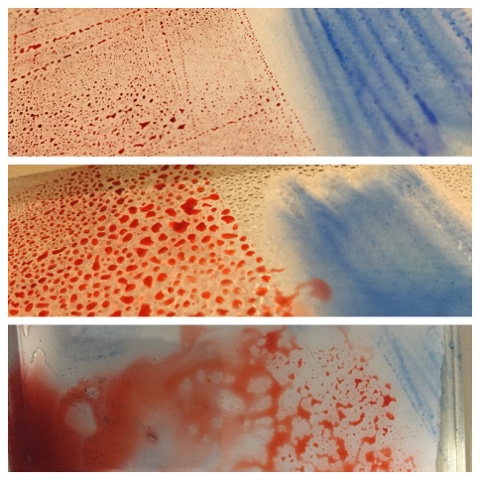
(Looking at the pics above...) And so... I put ink down... sprayed it... then sprayed some more. What a mess!
And these (above) were my results. Yep... for a couple of those I actually tried to DRAW something... hoping the colors would blend/run. Nope. Not for me! I'm not a fan of muddy gray when that's not the color effect I was going for. I'd been brought up to believe "red + blue = purple."
My patience gone... I decided to use a new die (Hello and THANK YOU, Simon Says Stamp!) I'd literally just gotten this week to utilize some of the wasted pieces I'd done. I can do something with it, can't I?
It'd been so long since I've used a thinner die, it took two passes for me to realize I needed the thicker "adjustment" plate. Another "duh" moment in my life.
Thanks to my wonderful little portable Xyron for helping me out here. I wasn't about to apply glue to these suckers!
I placed the wrong one first one down on one of my faves (craft cardstock!)... and realized it was slightly off. With that delicate of a cut, there was NO way I was going to be able to remove it and place it correctly in tact. So, I line up the die for placement purposes, and voila! There she is... Isn't she so pretty?
In light of several people passing recently, and my lack of sympathy cards in my stash, I decided to make this a beautiful one. because when you HAVE to do one and your mind is on the sad moments, your (at least mine!) best work isn't usually there. and they're thrown together. and ugh. they don't always look so great.
But... I had to chop the cut in order for it to go through my itty bitty Xyron after looking for 20 minutes for my bigger one... I just gave up and cut the dang thing. Remember to burnish well... I do this with my finger because I relate fingers to boogers so there are no glue boogers and then with a pen/pencil along the outline and the inside line/s. The sharper the better to get in every little crack.
A side view... So you can see the raised effects of that AWESOME die! I think I'm in love and you will definitely be seeing this one (and the other one I bought!) in the future! It is super versatile.
And the finished card. I didn't believe it needed that "something else" or "just one more thing". This one... I thought and still think it's just beautiful enough in it's simplicity.
 
*** A note *** When I created this card, it was before the mass shooting of officers in Dallas. Please take a moment with me and wish the officers, the families of those slain and the rest of our country peace. This isn't the answer! All lives matter. Yours, mine... ours... We are one and the same. Please love everyone. You don't have to "like" them... But they are all your people. You must love them.

Thank you for staying with me... Back to the topic of today... WATERCOLORING! which I really do L-O-V-E, only it didn't seem to want to do what it was supposed to... Like a rebel child/me! Up next is Jearise! Today's lineup (so you can be sure to visit everyone!):


Friday, September 18, 2015

International Day of Peace Blog Hop

Welcome to the
http://scrapsbygracie.blogspot.com

Today's hop is sponsored by
http://onlinecardclasses.com
... and they are giving away  one class of the winner's choice from their awesome catalog of classes. All you have to do to win this fabulous prize is comment on each of the blogs.  That's it! It really is easy. Of course, we would love it if you became a follower too.

Comment buttons can be found at the bottom of the post (on most of the blogs).
Now on with the hop!

International Day of Peace... What does that mean to you?

I know in some schools, they are focusing on anti-bullying campaigns. Students are making posters, hanging ribbons, and speaking out.

Some people are focusing on the peace within themselves... Me? I'll be on a pool deck, working with some wonderful officials. It is very peaceful there my husband thinks it's chaotic... don't ask...

Peace, peaceful, peacefulness... What is more symbolic than the Butterfly? So I made this great birthday card for my friend Kim I've known her since I was 18, and I'm not going to tell you how OLD I am... Her favorite color is purple, and I decided to add BUTTERFLIES! And yes... Her birthday is on National Day of Peace. What better way to show her PEACE?!? so I gave her some wine, too!

I cut the Anna Griffin Layered Butterfly Card with my Cricut Explore Air... but first "Let me take a Selfie"... hahaha... I couldn't resist! That's how my mind works! I flipped (mirrored) it, so I could let the Cricut do the writing on the inside!

I just L-O-V-E this feature! (This is done with the Metallic Purple pen...) And I just L-O-V-E all the sentiments that come with Anna G's stuff! I mean... yeah... I could make my own, but WHY???? When I have all these wonderful scrolly things that she's already created???

Moving on... I inked up a storm on the correct side of the butterflies. You do know the "outside" is the correct side, right? Ok then. I inked and inked until I had it blotchy in all the ways I wanted... (see the above photo!)

*** btw... this is just a note to self*** SELF! Be sure to use painter's tape or something next time so everything that you don't want getting inked on your card else can stay pristine!

I know you all read that...

Then... I cut a piece of patterned paper to fit the inside. Yes, yes, yes. You can cut the inside using the images from the cartridge. But, I don't want to waste all the paper (the trim and stuff the Cricut uses to hold onto the mat) that gets wasted. I'm way to cheap frugal for that.

Then I adhesived it all up (ATG'd the outer edge and Zigged the frilly stuff all throughout) and slapped that baby on. And Voila! It's done...
Um. No. It's not. It doesn't look like it's quite complete... So... I Zigged a little more (just around the butterflies) and added some purplish glitter... and... Voila!

NOW It's done!

I also squeezed in a little time to finish off some mummy hands... They're wishing you a Day of Peace, too! and just a little LOVE to Hang Loose!

Thanks for stopping by today, your next stop is Jearise.

Remember... Be sure to comment on each of the hops, in order to qualify for the giveaway! Good luck to you all, and Peace be with you! Enjoy everyday, and wish EVERYONE... PEACE!


Here's the lineup in case you get lost along the way.
Theresa ~ http://scrapsbygracie.blogspot.com
Kim ~ www.katydidcards.com
Haidee ~ http://created2bunique.blogspot.com
Alicia ~ http://goldengoddessdesigns.blogspot.com
Sharon ~ http://piece-ofheart.blogspot.com
Connie ~ http://conniecancrop.blogspot.com
Sarah ~ www.sarahbiswabic.blogspot.com
Nana's Scrap Spot ~ www.nanasscrapspot.com
Lisa ~ http://lisaslittlerascals.blogspot.com
Jearise ~ http://lorbysworld.blogspot.com

Friday, April 13, 2012

Paper Hoarders Design Team Challenge: Boni's Butterflies

So... I've been awarded another stint with the Paper Hoarders Design Team. Woohoo! And today's challenge is Boni's Butterflies... you see... Boni is a fabulous artist. She does all kind of neat-o stuff and is especially fabulous with all things steampunk. (You can see her work HERE! You'll see what I mean!) Well, anyway... Boni thought she'd be really cute and "assign" a challenge as a surprise to our head honcho. The challenge? Butterflies and joy.  What is more joyful than a butterfly, flying freely through the blue sky on a clear Spring day? I don't know... but I tried!

Here we have it... a butterfly done with Hannah Montana (on the Cricut, of course... because I have no other type of cutter 'cept my two hands and scissors...). The butterfly is custom cut in bright orange, then in textured yellow (a little bit smaller), and yellow-ish-orange vellum (ya'll know how much I love vellum, right?). I cut the wings off the body (didn't have a cut for just the wings...) for both the yellow and the vellum, but with the vellum, left a larger lip to apply adhesive and fold under the yellow wings. The yellow wings are inked with Persimmon (from Ranger's Distress Inks). The vellum... adhered with my ATG just where it touches the body, then folded under the yellow wings (to appear to float and to fly).

Then we add the glitter... Stickles in a bright orange and sunkist yellow around the wings, and a dark brown Studio G glitter glue for the body and antennae (I don't like it as much, it's not as smooth-going...).

So... I wanted the card to stand, but not be "on" something. Voila! In steps the 1/2-card! The 1/2-card is done in a vibrant lime green, textured cardstock (Colorbok), which I frayed with my new Martha Stewart shears. LOVE THESE and was so glad I finally had a chance to use them! Now... I'll admit, maybe I should have frayed the green up a bit higher... but, I was trying to maintain stability on the card. (I did/do want it to stay standing!).

Now, the pics kinda suck still... still learning the iPhone, and nobody seems to have any tips to hand out to me... so, until then, you're going to get the learning in progress. And yes... that is a cubbie... My craftroom in in shambles right now, and I can't seem to find the time to clean it up. So, since I was out of room everywhere, I simply emptied a cubbie that only had empty notebooks, and voila! a light box arose from debris of craftroom... hmm... a new type of Phoenix? We'll see. Hopefully, I'll get some time this weekend to fix it all up again.

Oh and a yeah... the Stickles were taking forever to dry, so... it'll look a lot better (less folding on the wings and more fluttering) when it's dry. So just ignore that for now.

And now, without further ado, if you'd like to join our challenge and/or see what everyone else on the DT did, please go and visit Tanya's blog, where you'll find lots of fabulous ladies showing us what they've got! and... thanks for stopping by!!!!

Tuesday, September 4, 2007

Museum of Natural History - the day before Sunday

Early Saturday morning, we drove away from another hot one in the Inland Empire. The sun was already a blazing 82 as we left the valley. It was much cooler the further we got.

We finally reached our destination of Exposition Park in Los Angeles, with a couple of detours and lots of traffic surrounding the park. Unknown to us, we would have to park a hike away from the Museum of Natural History amidst the party-goers and tail-gaters of the USC community and alumni.

As we waited in the long line of cars waiting to park (who knows why there was only ONE cashier collecting money and guiding vehicles...), I spotted a dude with a cool, home-made hat! Do you drink Bud Light? (I don't.) Anyway, I thought it was cute and got a pic!

Hey! Those people are serious partiers! I could not count how many pop-up tens and canopies there were. Everyone congregates together. There were buffets set up under tents of individual groups, with generators going, crockpots, microwaves and televisions. I wonder how many of these people actually had tickets to the game... To think they would have to pack up everything and not worry about theft before going to the game... Hmm...

Anyway, back to the Museum. And so we parked and walked to the museum. Down we went to the basement (had to use the ramps, you know... strollers), where the less-traveled entrance seems to be... and entered a really cool area where insects, spiders, and a touchy-feely exhibit of bones and stuff is on display for the kids to touch and feel. Great area. The kids loved it. I did, too. (It gave me a fresher look at our turtle's environment. I think I'm going to do some redecorating in my turtle tank!)

Then we went back outside, through the main entrance (lots of steps and a HUGE ramp, going through "party central"). On the lawn of the museum was the "Butterfly Pavilion"- the reason we came that day. The exhibit was due to close that weekend. My mom and her hubby were nice enough to treat us to a day to enjoy the wonders of the butterfly world and all that the museum has to offer.
Ms. Marissa was mystified as she entered. I couldn't get enough cute pics of her... She often tried to hold her hands out to get the butterflies to land on her, but they wouldn't. She got awfully close to them, so close she could breathe on them. Her wonderful smile and delighted face were worth it.

Stacy and Rey were having fun, too. They found all of the dead butterflies, spider webs and spiders. (They are looking forward to the new exhibit, coming at the end of September... Spider Pavilion... then the Haunted Museum at the end of October...)

Jake (my nephew) is always happy. There is nothing that doesn't make this little tiny thing happy. (His laugh makes us laugh, too... it's so cute!!!)

We went through other portions of the museum, too. Marissa had to scream, "Sharptooth!" just to add dramatic affect to the dinosaur bones exhibit. And, she had to see the elephant exhibit a couple of times. We finally told her we would come back again, otherwise she wouldn't leave the museum. Those were her favorites.

This photo was taken as we left, directly outside the museum. It was a hard pic to take. Two teenagers, who wanted to do gross things while taking the pic (Rey kept trying to put her finger up the statue's nose...) and two toddlers that want to walk off make it a hard picture to get. Got the best that I could.

All in all, it was a wonderful day, and all of the kids had a good time... so did my mom and I! Thanks, Mom and John for a wonderful opportunity. We hope to go again soon! There is so much more to see!

For more information on the Museum of Natural History, visit http://www.nhm.org/ for updates on exhibits, information or membership. Also, to see our heartfelt thanks to Mom (Grandma) & John (Grandpa), visit this link: http://www.smilebox.com/playBlog/4d5445334e446b794e413d3d0d0a

Toodles for now! lisa