Showing posts with label die-cutting. Show all posts

Friday, March 10, 2017

[Connie's] Birthday Bash Blog Hop!


Welcome to the 
Birthday Bash Blog Hop

We hope you are ready to celebrate Birthdays with the biggest Bash around!!
This hop is full of Balloons, Cake, Presents, Smiles and more!
So let's make a wish and blow out the candles
as we celebrate another year of birthdays!! 

  You should have arrived Shannon H.
If you just happened upon this spectacular hop, Connie Can Crop is the first stop in this hop. 

This is a one day blog hop, but you have until Sunday to finish hopping and leaving your comments for all of these amazing crafters.


We have an awesome sponsor for this month!


One lucky winner will get to choose two Bundles or files of their choice ($6.00 value)
Please visit Miss Kate Cuttables HERE
Follow their blog HERE
you can find them on facebook HERE


What do you need to do to win? Easy... become  a follower of each of the fabulous blogs in this hop and leave each of them a comment letting them know what you like best about their projects.

You will have until 10 pm Sunday to finish the hop and leave your comments.
Winners will be announced on Wednesday 3/15/17
at Connie Can Crop.
Be sure to follow everyone and leave a comment along the way!

OMG! My friend Connie is.... (shhhh.... $&!!!!) and if you can't figure that out... look at the corresponding numbers on a "normal" computer keypad... and that's a good age, too! Because... that's what I'll be later this year! So... HAPPY BITHDAY, CONNIE!!!!

I made... a card... hmm... I really tried to use something else. I did a "gatefold" type. I'm not sure I did the "3-way" dies right... But, YOU can take a look for yourself and see...
I had a 1/2 sheet of cardstock, scored it at 2-1/8", then flipped it and repeated. Really flipped it because I didn't want to do the math. It worked out just fine... And I was starting with this die and this paper (my LAST bit of THAT paper... so I had to make it work...).
I ran it through a total of 4 times (2 on each flap side) and had to do that... because it didn't fully cut through (you'll see that later...).
Don't do THIS at home... (if you're going to use a paper as a backing... be sure to apply adhesive to the DECORATED SIDE!!!)
Ummm... Spectrum Noire Glitter Pens go through TWO layers of cardstock. 
Use it sparingly...
The dies probably cut much better if you empty them out of their previous cuts' little tiny pieces. I was a tad on the lazy side that day..
And Voila! There you have it...
Be careful with wild brush pens, as they are likely to go WILD and do their own thing... No... my kid DID NOT color this. I did. Um... Yes... I need A LOT
more practice... but... I've said that before...

 Up next is Marji!

Here's our line up in case you get lost:


Don't forget to check out this month's new challenge at Connie Can Crop!!


Connie Can Crop Challenge #56
due 11:59 P.M., Friday, March 31st, 2017
Pacific Time

Saturday, July 9, 2016

A Year of Card Techniques - (July) Watercoloring

If you are here for the Under the Sea Blog Hop, please go HERE, or you can check out all of my hops for today (there's only two!). We'd I'd love to have you!

Welcome to...

It's month seven of our year long adventure into different card-making techniques, folds and paper crafting products. We hope you got the chance to hop with us each month.It's not to late to hop and comment to be entered into our prize drawing. If you missed any of the previous months,  you can click on the month to be taken directly to the start of that month's hop.
January HERE   February HERE   March HERE   April HERE   May HERE   June HERE

This month we are playing with watercoloring and you won't want to miss the amazing and fun cards we've got for you today. We really love feedback, so please leave a comment on each of the blogs in today's hop. Each comment on the 12 hops throughout the year will be entered into a drawing for a $25 Blitsy.com or Stampin' Up gift certificate (Winner's Choice).

Now on with the projects!
I tried several types of paper... one of them being THIS (above). Watercolor Cardstock is thick and absorbs the watercolors the water fairly well but doesn't let the colors run like I wanted it to... Oh! And it curls less you know, as papers tend to do when they get hot or wet...
 
 This is just a tidbit (nothing really related to the post)... Um... What's up with THIS, Ranger? I bought two of the same color inks not because I didn't know what I had! as the name is the same, but the color tone on the cover is different. Guess what? They're the same flippin' color. Buyer beware!
I have many Distress Inks... and thought I'd try some watercolor inks as well. I think I like the Distress Inks WAY better for the blotting effect. You'll see as you get closer.
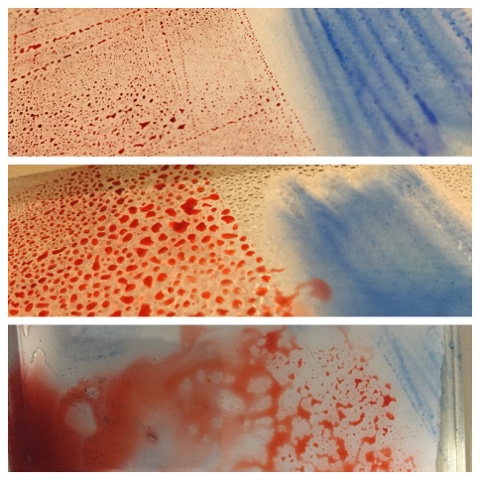
(Looking at the pics above...) And so... I put ink down... sprayed it... then sprayed some more. What a mess!
And these (above) were my results. Yep... for a couple of those I actually tried to DRAW something... hoping the colors would blend/run. Nope. Not for me! I'm not a fan of muddy gray when that's not the color effect I was going for. I'd been brought up to believe "red + blue = purple."
My patience gone... I decided to use a new die (Hello and THANK YOU, Simon Says Stamp!) I'd literally just gotten this week to utilize some of the wasted pieces I'd done. I can do something with it, can't I?
It'd been so long since I've used a thinner die, it took two passes for me to realize I needed the thicker "adjustment" plate. Another "duh" moment in my life.
Thanks to my wonderful little portable Xyron for helping me out here. I wasn't about to apply glue to these suckers!
I placed the wrong one first one down on one of my faves (craft cardstock!)... and realized it was slightly off. With that delicate of a cut, there was NO way I was going to be able to remove it and place it correctly in tact. So, I line up the die for placement purposes, and voila! There she is... Isn't she so pretty?
In light of several people passing recently, and my lack of sympathy cards in my stash, I decided to make this a beautiful one. because when you HAVE to do one and your mind is on the sad moments, your (at least mine!) best work isn't usually there. and they're thrown together. and ugh. they don't always look so great.
But... I had to chop the cut in order for it to go through my itty bitty Xyron after looking for 20 minutes for my bigger one... I just gave up and cut the dang thing. Remember to burnish well... I do this with my finger because I relate fingers to boogers so there are no glue boogers and then with a pen/pencil along the outline and the inside line/s. The sharper the better to get in every little crack.
A side view... So you can see the raised effects of that AWESOME die! I think I'm in love and you will definitely be seeing this one (and the other one I bought!) in the future! It is super versatile.
And the finished card. I didn't believe it needed that "something else" or "just one more thing". This one... I thought and still think it's just beautiful enough in it's simplicity.
 
*** A note *** When I created this card, it was before the mass shooting of officers in Dallas. Please take a moment with me and wish the officers, the families of those slain and the rest of our country peace. This isn't the answer! All lives matter. Yours, mine... ours... We are one and the same. Please love everyone. You don't have to "like" them... But they are all your people. You must love them.

Thank you for staying with me... Back to the topic of today... WATERCOLORING! which I really do L-O-V-E, only it didn't seem to want to do what it was supposed to... Like a rebel child/me! Up next is Jearise! Today's lineup (so you can be sure to visit everyone!):


Friday, March 11, 2016

A Year of Card Techniques - (March) Inlaid Diecutting


If you are here for the Once Upon a Time Blog Hop... please go HERE! (or... scroll up and check out all my posts for the day! I'm kinda great!)
http://scrapsbygracie.blogspot.com/2015/12/a-year-of-card-techniques-march-blog-hop.html

It's month three of our year long adventure into different card-making techniques,
folds and paper crafting products. We hope you got the chance to hop with us in January for the emboss resist technique and in February for ink layering. It's not to late to hop and comment.
If you missed January's hop, you can still hop and comment by starting HERE.
If you missed February's hop, you can still hop and comment by starting HERE.

This month we will be focusing on inlaid die-cutting and you won't want to miss the awesome cards we've got for you today. We really love feedback so please leave a comment on each of the
blogs in today's hop. Each comment on the 12 hops throughout the year will be entered into a drawing for a $25 Blitsy.com gift certificate.

Now on with the projects. (If you'd like to see the YouTube videos that may may not have inspired me/us... Check them out here:
Ok. I'm letting you know RIGHT now... this one was a bit harder for me... First of all... I don't own many dies. (I'm kind of an electronic kinda gal...) So here's what I had to work with:
 
And believe it or not, I picked one of the more intricate (The Butterfly) piece first. Got completely frustrated with all those hecka tiny pieces (you'll see below) and gave up for some simplicity.
 
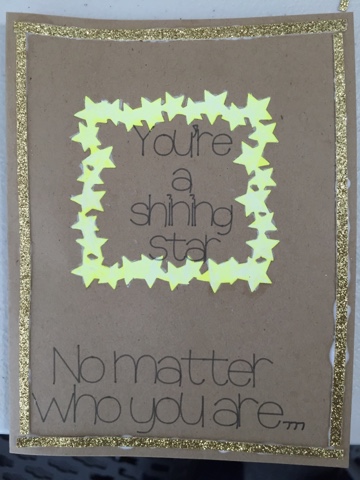
And so... I chose the star frame. Easy? Not so much.
I went with the above colors...
And tried to run it through my Cuttlebug. Man, I sure wish I had some of that "Post-It" tape... Probably wouldn't have had to do so many tries and waste so much paper! Um... It moves!!!
So after all the sandwiching and passing, this is what I ended up with...
And all these itty bitty pieces...
But, today was a day I really felt like getting all gluey and peeling glue off my fingers. We all need to revert back to being a child once in a while...
And you know you gotta smoosh it around with your finger... Because who DOESN'T like peeling dried glue off their hands? I L-O-V-E it!
Piecing it together... It really is more tedious than it looks...
Like a puzzle... Which way does it go? Yes... I tried several times...
See that itty bitty teeny tiny piece on my fingertip? Yep. I had to try to get it into one of the equally small holes... THE RIGHT WAY! and see...? I'm still letting my finger(s) dry, so I can peel the glue...
THAT's the hole I had to fit it in...
And... just a hint... if you use CRAFT cardstock, run/pass it through several times, otherwise you'll get one of these bits that just isn't cut all the way through. Try that! on for size... major frustration and re-doing...
And some edges stick up... Ugh... Might as well get out my faves... (see below!)
Clear plastic and a BRAYER to the rescue! That's right... roll it all down really tight!
And then we have the above... And that glue still needed to dry...
And um... Be sure you put either some plastic between the layers or something, because otherwise, it might stick together? Uh... Yeah... It's a no-brainer. And I didn't have the brain that day...
So... I wanted to have my Cricut write inside my card... Only...
Design Space wasn't being friendly with the line-spacing... Ugh.
But, I changed it and got it... And then (as I've shown several times before...) I moved it to where I wanted it on the mat (which I had the physical mat loaded with the card... brayer-ed on, of course!).
Note: If you're not sure if it's going to "write" in the "right" place, use the stylus, and it will lightly emboss the path... If that's right, just do it again. Only this time with a pen... Yep!
Watch that baby roll!!!!!
And see? Gorgeous... But not quite enough... See the Wink of Stella I added?
Awww... Beautious! But still... not enough...
So... Strips of glitter card stock were added and brayer-down. If you don't know these lyrics... and they're not humming through your head yet, ask an "older" person... It's from the '70's!

Hope you enjoyed my simplistic card! I'll try it again... after I get some less-complicated dies. It really is cool!

Up next is Jearise! Check her work out and see what types on in-laying she did! This is pretty incredible!

Here's today's line-up in case you get lost along the way
Theresa
Lisa
Jearise
Kim
Claudia
Denise
Debbie
Sharon