Showing posts with label blogging. Show all posts

Friday, October 21, 2016

Exploring Family History Blog Hop

Welcome to the Exploring Family History blog hop.  We are creating crafts related to our family history.  Most of us would agree when began paper crafting to create a historical record of our and for our families.  Of course, we love to get inky and sticky while doing it so let's dig into our crafty family history projects.

But first, we would like to say a HUGE THANKS to our sponsor today.

Theresa is giving away a $20 Stampin' Up Gift Certificate to one lucky winner
AND take 10% off any order placed through her (not available on website) by October 31th. 
Email her at scrapsbygracie@gmail.com with your order. 

All you have to do to win this fabulous prize is comment on each of the blogs.
That's it! It really is easy.  
Of course, we would love it if you became a follower too. 

Comment buttons can be found at the bottom of the post (on most of the blogs).
Now on with the hop!
 
When Theresa first put this hop out there, I thought... "Self... [yes, that's what I call myself... 'Self.'] You really do need to create a "family" album, giving out our history." And my other self (yes, I do have more than one... don't you?) told the other one to go fly a kite, in not such nice terminology. But, I decided to go against Hyde the one self and begin one anyway.
 
I found this really great cut through Design Studio... And began cutting.
As always because it's me... I ran into several little tears snags. And I worked through them. Yay me!
I've briefly shown you (through the pictures) all the I did to overcome them...
However, some of my efforts made the original flaws worse failed...
So I had to fix those, too!
And yep... here after the gluing, I used my handy-dandy brayer, an old Cricut mat overlay, and brayered those babies leaves/cuts down into the glue and onto the cardstock.
And here ya have it! Don't ya just love what it says??? It's meant to be the "title" page in my upcoming book Family Album, but now that it's done and looks all cool and all that... I just might put it up on my wall, instead... Hmmm...

Next up is the fabulous Card A Day Design Challenge Team! And in case you missed anyone, or want to go back to get more [her]story... Here's today's lineup:

Alicia - http://goldengoddessdesigns.blogspot.com/
Sue - http://suek86401.blogspot.com/...
Holli - http://sunflowerholli.blogspot.com/
Lisa - http://lisaslittlerascals.blogspot.com/
CADC - http://cardadaychallenge.blogspot.com/
Theresa - http://scrapsbygracie.blogspot.com/

Friday, September 9, 2016

Smarty Pants Blog Hop

If you are here for the Year of Card Techniques, please go HERE, or you can check out all of my hops for today (there's only two!). We'd I'd love to have you!


Welcome to the 
Smarty Pants Blog Hop
Thank you for joining us for a blog hop dedicated to all the smart kids out there starting school and the amazing people who teach them!


Connie Can Crop is the first stop in this hop. This is a one day blog hop and we appreciate your leaving a comment for all of these amazing crafters.

We have an awesome sponsor for this month! 

One lucky winner will win a $20 gift card to shop their awesome files in their shop! 
Be sure to check out their shop online HERE
Visit them on facebook HERE
Follow their blog HERE for freebies and inspiration!


What do you need to do to win? Easy... become  a follower of each of the fabulous blogs in this hop and leave each of them a comment letting them know what you like best about their projects.

You will have until 10 pm Sunday to finish the hop and leave your comments.
Winner will be announced on Wednesday 9/14/16 at Connie Can Crop.
Be sure to follow everyone and leave a comment along the way!

Let's head on it to the classroom and see these amazing back to school projects!


Did you know I work in a school? Yes! They let even my people in! Imagine that! I love to help decorate the classrooms. And this year, I have one of the most awesome teachers to partner with.
One of the boards she wanted to make would encourage kids to do well and go to college. Great idea! Off to Pinterest she headed... and found THIS and THIS!
But we can do better, ey? I mean... We can totally work with that idea, right?
 
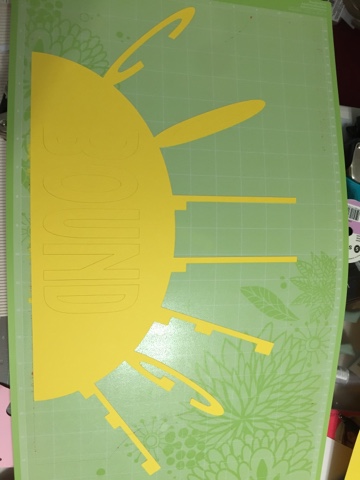
And off to Design Space I went... Designed a sun... with the letters C-O-L-L-E-G-E as the sun's rays and "BOUND" in the half-sphere of the sun...

Because of the extra large size of the cut (had to use my hardly-ever-used 12x24" mat... and the regular construction paper wasn't long enough, so I compromised and spliced it all together (as shown below) 
The finished cut... (before the weeding...and I don't mean the kind in the garden)
Our beautiful sun laminated those high school kids can't keep their hands off stuff, you know! The trick to putting the holes from the "O" and the "B" in the center? (in a whisper) It's laminated twice. Once without the space-keepers. Put them on the lamination in the correct spots with a touch of glue, then run it through the machine again! I wanted the sky to show through... that's why it's laminated, and not mounted on a board or other background. Duh.

OK, so laminating it twice gives the lamination a bit of wrinkle, but who doesn't have that? I know I do... So get over it, would you?
And my teacher made these awesome signs, pointing the ways to our California Universities...(different systems)... and here you see the bold blue of the sky ad the cool green of the grass (all fabrics! so as not to tear so much or lose color throughout the school year!).
And our winding road... because YOU know it's not a straight-away to college. There are lots of curves ahead!
This is my favorite... I love the borders my teacher (partner... I'm an assistant just in case you were wondering...) It is double sided, so I was able to center it and flip a couple of pieces to put flowers on the outsides of the quote. The quote... so beautiful! "The future belongs to those who believe in the beauty of their dreams." Eleanor Roosevelt was such an inspiration!
 
And our full board yes, you can see other boards, too... don't get picky!... a thing of beauty!
 
I've done other boards too, but here's one of my faves, if you want a throw-back... or ideas of your own!
 Up next is Rebecca!


Connie Can Crop Challenge #50
due 11:59 P.M. Friday, September 30th
Pacific Time

A Year of Card Techniques - (September) Mixed Media

If you are here for the Smarty Pants Blog Hop, please go HERE (not available until 9pm PST!), or you can check out all of my hops for today (there's only two!). We'd I'd love to have you!
 
Welcome to...
 
 
It's month nine of our year-long adventure into different card-making techniques, folds and paper crafting products. We hope you got the chance to hop with us each month.

It's not to late to hop and comment to be entered into our prize drawing. If you missed any of the previous months,  you can click on the month to be taken directly to the start of that month's hop.
January HERE   February HERE   March HERE   April HERE   May HERE   June HERE   July HERE August HERE

This month, we are mixing it up a bit with the mixed media techniques and you won't want to miss the amazing and fun cards we've got for you today. We really love feedback, so please leave a comment on each of the blogs in today's hop. Each comment on the 12 hops throughout the year will be entered into a drawing for a $25 Blitsy.com or Stampin' Up gift certificate (Winner's Choice).

Now on with the projects.

I started with THIS:
Made a mini album, with a whole bunch of different stuff... took pictures... gave it to my "secret pal"... and when I went to put in pics and write about it, the rest of the pics were gone! I can't ask my "secret pal," because then it wouldn't be so "secret" right? Ugh!

And so... I'm going to post a past project... since I use a whole bunch of different media all the time anyway. And OH CRAP! It's not a card... but then again my original project wasn't either. Oh well. It's still great techniques you can use for cards...
If you know me... you know I don't take many pictures of myself or scrap them either. I'd rather not. But... I did enjoy this piece and fun playing with the major components of it. I distressed the crap out of every picture. NOTE: They are printed on textured cardstock!!!!
This lace? I made it myself! Velum... punched with Martha Stewart, stitched through with my machine, then dyed with Walnut stain and crinkled... then formed in the shape of a heart. Say it with me now... "Awwwww...!"
These are "ghost letters" with paint on the back. LOVE IT!!!!!
Thrown together, distressed a bunch and put in a book... totally my style! If you'd like to see the original post, please feel free to go HERE (It's back from 2012!)
 
Hope you enjoyed my little blast from the past...
 
Up next is Denise! Today's lineup in case you get "mixed up" (so you can be sure to visit everyone!):
 

Friday, August 12, 2016

Silly Old Bear Blog Hop

If you are here for the Year of Card Techniques (August) Blog Hop, go HERE (or stick around and check out both of my posts for the day! I can be awesome at time, you know!)

Welcome to the 
Silly Old Bear Blog Hop
Thank you for joining us for a blog hop dedicated to everyone's favorite bear, Winnie the Pooh!

You should have arrived from Daphne's Blog. If you need to start at the very beginning,
Connie Can Crop is the first stop in this hop. This is a one-day blog hop, and we appreciate you leaving a comment for all of these amazing crafters.

We have a WONDERFUL sponsor this month!!


One lucky winner will win an awesome digital CD worth £19.99

Be sure to check out their shop online HERE
Visit them on Facebook HERE
What do you need to do to win? Easy... become  a follower of each of the fabulous blogs in this hop and leave each of them a comment letting them know what you like best about their projects.
 
You will have until 10 pm Sunday to finish the hop and leave your comments.
Winner will be announced on Wednesday 8/17/16 at Connie Can Crop.
Be sure to follow everyone and leave a comment along the way!

"Winnie the Pooh, Winnie the Pooh,
A tubby, little cubby, all stuffed with fluff.
He's Winnie the Pooh, Winnie the Pooh.
A willy, nilly silly old bear."

Let's head on it to the Hundred Acre Woods and visit with this Silly Old Bear!
 

And so... I took a lot longer than normal to come up with an idea... I owe lots of people lots of cards, so I thought I'd whittle down that I-O-them U pile. A couple of weeks ago, we had the SCS Junior Olympics (swimming) at Riverside City College (in Southern California). A bunch of us "officiated" (AKA: refereed), and dripped sweat quite a bit. I know... TMI... But dang it! insert word of choice here... It was hot! And during a break, a wonderful lady official went out of her way to go to the store to get all the rest of us... ICE CREAM! What a doll!!!! Then I asked her for her physical address and now she probably thinks I'm a total kook, because she hasn't gotten anything in the mail and she DID give me her address... So... I designed this card with her in mind! (in Cricut Design Space, of course!)

I've totally been trying to use/utilize my scraps! Make the most of them! Save that tree!!!! (and just so you know in case you don't remember me telling you before you can move your cut around on the mat in Design Space before cutting, so the placement is perfect for you.)
All of these pieces, even the teeny tiny ones... will go together to make my card.
OMGosh! It totally sucks when you've been way too busy to clean as you go and your table looks like this and you can't find a thing and you have to use another adhesive than you planned on and it gets so slippery...
This is how little Winnie is getting layered. I am so thankful Cricut artists are thoughtful enough to design in the lines to line up our cuts! Otherwise, I'd flippin' be there for.ever! and still never get a thing done!
And don't believe everything that is demonstrated at a srapbooking show! See that sleeve? It's already lifting up! Soooo... I used my handy dandy brayer to get it all down. Works like a charm...
until this happens and stuff like icecream slides all over the place.
And through it all together and brayer it all together and there she is all together and ready to roll! or get mailed... FINALLY!
A little close-up... Shhh... he's sleeping!

 Up next is there is no "up next"... but you can start at the beginning with Connie, as I'm the last bit. Thanks for visiting, and I hope you enjoyed your time in the 100-Acre Wood. Be sure to comment, and come back again!

And don't forget to check out the this month's challenge at 
Connie Can Crop!!


Connie Can Crop Challenge #49
due 11:59 P.M. Wednesday August 31st
Pacific Time

Saturday, July 23, 2016

Christmas in July! (Day Two)

Welcome to Day Two of... Christmas in July!

We just couldn't stop playing with the holiday theme, so we've got a second day filled with great ideas that you can start creating now for Christmas. Along the way today, you'll find card and gift ideas, a scrapbook layout page or two and even a couple great decorating ideas.

We hope this hop gets you in the holiday spirit a little early this year.

We'd like to say a HUGE THANKS to our sponsor today.
http://www.stampinup.net/esuite/home/scrapsbygracie/

Theresa is giving away a $20 Stampin' Up Gift Certificate to one lucky winner AND take 10% off any order placed through her (not available on website) by July 30th. Email her at scrapsbygracie@gmail.com with your order.

All you have to do to win this fabulous prize is comment on each of the blogs. That's it! It really is easy. Of course, we would love it if you became a follower too.

Comment buttons can be found at the bottom of the post (on most of the blogs). (and for those that you can't find... it's probably at the top next to the title of the post!)

Now on with the hop!

Can you tell I'm not all about cards or layouts at Christmas YET?

I'm extremely cheap! frugal. I saw some stand-up letters somewhere, all decorated and such... and they cost $30! per set!!!! of two!!!! OMG!!!! He** NO! I would NEVER pay that. That'd be $90 for Santa to laugh!

So I bought some paper mache letters at Michaels remember I'm cheap... so of course I used a coupon! and painted them up. I was going for the "snowy mist" look... it didn't work. How do most of us fix mistakes? Cover them up! Work with them. I applied a ton of Mod Podge then sprinkled a ton of ultra-fine red glitter. Remember... it gets EVERYWHERE!!!! Just a little note here... There aren't painting pics because I probably accidentally deleted couldn't find them. So sorry. Not sorry. They really were kind of boring pics...
I wanted my letters to sit together permanently, but be separated. Make sense? Well! It does to me! I used my FAVORITE silicone caulking! It's not just for cards and layouts, people!!! and made three little lifted blobs and set them together, making sure they were the perfect distance apart. And no... I didn't glue the three sets of letters together, Silly! Can you imagine the nightmare of storage?
More up-closes of my beauteous letters! Sorry I don't have a Christmas-sy background... it's a little early in the year for that! Also... I hope you don't take the "HO, HO HO" personally.. if you do, please get therapy for your issues and don't take them out on me!
and here are all three sets! I haven't decided yet if they'll go on different shelves... or all in a row... or strung out... the possibilities are endless. But I love how they turned out! Don't you? And I did have a friend ask me, "Where's mine?" LMAO! Are you kidding? Wait for your birthday, girl!

Miranda's up next, and I'm pretty positive she's got some more holiday bling to share with you.

Here is today's hop line-up in case you get lost along the way:

Theresa ~ http://scrapsbygracie.blogspot.com
Barbara ~ http://barbarab3.blogspot.com
Kim ~ www.katydidcards.com
Alicia ~ http://goldengoddessdesigns.blogspot.com
Lisa ~ http://lisaslittlerascals.blogspot.com/
Miranda ~ www.nanasscrapspot.com
Daphne ~ http://craftyscrapsofstuff.blogspot.com/
Holli ~ Sunflowerholli.blogspot.com
Sharon ~ http://piece-ofheart.blogspot.com
Sarah ~ www.sarahbiswabic.blogspot.com
Amanda ~ http://salnclts76.blogspot.com
Jearise ~ http://lorbysworld.blogspot.com

If you missed Christmas in July! (Day One), please go to Theresa's blog and scroll down a post. Or... you can start HERE! and hop on through.

Friday, July 22, 2016

Christmas in July! (Day One)

Welcome to Christmas in July! (Day One)

Get ready for some great ideas that you can start creating now for Christmas. Along the way today, you'll find card and gift ideas, a scrapbook layout page or two and even a couple great decorating ideas.

We hope this hop gets you in the holiday spirit a little early this year.

http://www.stampinup.net/esuite/home/scrapsbygracie/

Theresa is giving away a $20 Stampin' Up Gift Certificate to one lucky winner AND take 10% off any order placed through her (not available on website) by July 30th. Email her at scrapsbygracie@gmail.com with your order.

All you have to do to win this fabulous prize is comment on each of the blogs. That's it! It really is easy. Of course, we would love it if you became a follower too.

Comment buttons can be found at the bottom of the post (on most of the blogs). (On a few blogs, the comment button is at the top, near the title.)

Now on with the hop!

If you came here from Alicia's blog (Golden Goddess Designs), then you're in the right spot. She sets the bar pretty high, doesn't she?

Do you remember... how I said I was going to get to organizing my craft room and use up what I've got and not purchase anything else? ever needing a food-safe goodie bag, but never finding the right size, color, or pattern? I sure do! So when HSN aired their 24-hour crafting event earlier this month, boy, was I in trouble! I saw the perfect solution! We R Memory Keepers has the most awesome tool to create custom bags. And it came with food-safe glassine paper, too! It came with mini clothespins and gold sticker/sealer-thingies, too... but I'll probably never use those...
And so... I played! And played! And played! I made several different sizes. Here's my notes:
  • Be sure to keep the instructions just in case you have a "Duh!" moment and it comes super late, like I do so often
  • Do not place the paper (and the tool) on a gripping surface. (The paper doesn't quite rip as easily - it grips to the mat/surface.) A self-sealing mat will suffice and work well. It goes so much better. I know this after making over 15 bags. It took a while for me to figure that part out.
  • Do not cut the paper in the size you want, lengthwise... Only cut the width. Otherwise, you'll be "duh'ing" yourself every time you have to grip a teeny tiny edge to make your bag not "shrink" due to "waste". (like I did... many, many times!)
And so... after semi-perfecting my bag-making... I began my Christmas bags!

I got this perfect paper (on a roll) a while ago 2 years ago and was hoarding it! from Williams-Sonoma. I don't know why... but on a trip there less than a year ago, I tried to get more and they claimed they've never carried it. It is not currently available, I guess.
Adding to the notes:
  • Be sure to cut the edge (sides) of your paper straight! If you don't, then your bag and measurements will be a total disaster... trust me...
The directions come with the tool... but just in case...
  1. Cut the top and bottom to the size you want with the serrated edge of the tool. GO SLOWLY. unless you want to rip the paper... it's pretty easy to do.
  2. Fold the paper along both sides according to the tool indents. Use the tool to fold it perfectly.
  3. Fold the bottom up. Use the tool to fold it perfectly.
  4. Add adhesive to the inside (wrong side) edge of one side, and the folded outside (right side) edge of the other side and press together. (I used my ATG gun for this. Worked perfectly!)
  5. Add adhesive to the bottom flap and fold up. Voila!
See the inside? Isn't it WONDERFUL????

Yep! My need is for 100!!! I can do it!!!
Add a tag... change it up and add it several ways. Secure it, or don't. It'll look great either way. Now they are just waiting for some Christmas cookies! Yum! Thanks for visiting!

Miranda's up next, and I'm pretty positive she's got some holiday cheer to share with you.

Here is today's hop line-up in case you get lost along the way:

Theresa ~ http://scrapsbygracie.blogspot.com
Barbara ~ http://barbarab3.blogspot.com
Kim ~ www.katydidcards.com
Alicia ~ http://goldengoddessdesigns.blogspot.com
Lisa ~ http://lisaslittlerascals.blogspot.com/
Miranda ~ www.nanasscrapspot.com
Holli ~ Sunflowerholli.blogspot.com
Sharon ~ http://piece-ofheart.blogspot.com
Sarah ~ www.sarahbiswabic.blogspot.com
Amanda ~ http://salnclts76.blogspot.com
Jearise ~ http://lorbysworld.blogspot.com

Be sure to hop tomorrow too for even more great holiday projects and ideas. You can start tomorrow at Theresa's blog.