Showing posts with label back-to-school. Show all posts

Friday, September 9, 2016

Smarty Pants Blog Hop

If you are here for the Year of Card Techniques, please go HERE, or you can check out all of my hops for today (there's only two!). We'd I'd love to have you!


Welcome to the 
Smarty Pants Blog Hop
Thank you for joining us for a blog hop dedicated to all the smart kids out there starting school and the amazing people who teach them!


Connie Can Crop is the first stop in this hop. This is a one day blog hop and we appreciate your leaving a comment for all of these amazing crafters.

We have an awesome sponsor for this month! 

One lucky winner will win a $20 gift card to shop their awesome files in their shop! 
Be sure to check out their shop online HERE
Visit them on facebook HERE
Follow their blog HERE for freebies and inspiration!


What do you need to do to win? Easy... become  a follower of each of the fabulous blogs in this hop and leave each of them a comment letting them know what you like best about their projects.

You will have until 10 pm Sunday to finish the hop and leave your comments.
Winner will be announced on Wednesday 9/14/16 at Connie Can Crop.
Be sure to follow everyone and leave a comment along the way!

Let's head on it to the classroom and see these amazing back to school projects!


Did you know I work in a school? Yes! They let even my people in! Imagine that! I love to help decorate the classrooms. And this year, I have one of the most awesome teachers to partner with.
One of the boards she wanted to make would encourage kids to do well and go to college. Great idea! Off to Pinterest she headed... and found THIS and THIS!
But we can do better, ey? I mean... We can totally work with that idea, right?
 
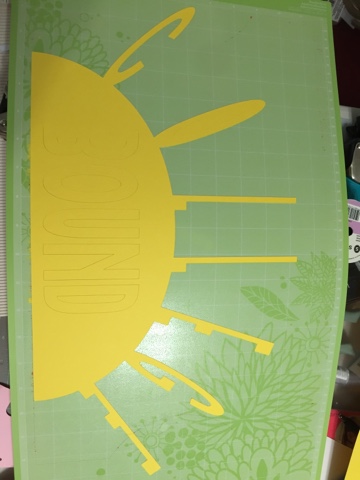
And off to Design Space I went... Designed a sun... with the letters C-O-L-L-E-G-E as the sun's rays and "BOUND" in the half-sphere of the sun...

Because of the extra large size of the cut (had to use my hardly-ever-used 12x24" mat... and the regular construction paper wasn't long enough, so I compromised and spliced it all together (as shown below) 
The finished cut... (before the weeding...and I don't mean the kind in the garden)
Our beautiful sun laminated those high school kids can't keep their hands off stuff, you know! The trick to putting the holes from the "O" and the "B" in the center? (in a whisper) It's laminated twice. Once without the space-keepers. Put them on the lamination in the correct spots with a touch of glue, then run it through the machine again! I wanted the sky to show through... that's why it's laminated, and not mounted on a board or other background. Duh.

OK, so laminating it twice gives the lamination a bit of wrinkle, but who doesn't have that? I know I do... So get over it, would you?
And my teacher made these awesome signs, pointing the ways to our California Universities...(different systems)... and here you see the bold blue of the sky ad the cool green of the grass (all fabrics! so as not to tear so much or lose color throughout the school year!).
And our winding road... because YOU know it's not a straight-away to college. There are lots of curves ahead!

This is my favorite... I love the borders my teacher (partner... I'm an assistant just in case you were wondering...) It is double sided, so I was able to center it and flip a couple of pieces to put flowers on the outsides of the quote. The quote... so beautiful! "The future belongs to those who believe in the beauty of their dreams." Eleanor Roosevelt was such an inspiration!
 
And our full board yes, you can see other boards, too... don't get picky!... a thing of beauty!
 
I've done other boards too, but here's one of my faves, if you want a throw-back... or ideas of your own!
 Up next is Rebecca!


Connie Can Crop Challenge #50
due 11:59 P.M. Friday, September 30th
Pacific Time

Friday, August 31, 2012

ACTION!: Paper Hoarders DT Challenge

This week's Design Team Challenge over at the Paper Hoarders is ACTION! Meaning... it's gotta move. And I "do" move. So, I'll catch briefly catch you up to see what I've been working on...

Whew! It's been busy. School started here a couple of weeks ago (as seen in a previous post...), and I've been workin' it. Besides my normal everyday volunteer work (in the Kinder classes, 1st and now 2nd grades), I've been working-working as an assistant in the RSP program at another school.

And I'm having a blast!

On the first day of school, I walked into a fairly large classroom, with {gasp!!!} blank bulletin boards. My new teacher let me know that I could give her my ideas, and she'd let me know. [oh yeah!!! crafter's dream!!!!] She told me what type of boards we would need (1st, 2nd and 3rd grade ELA themes [for their current stories], Comprehension, Reading, Fluency Goals, and Math). So I set to work researching on the internet. (I'd never done those type of things before, but you know me... a challenge is a challenge, and I kinda L-O-V-E those!

eHow was a great tool... there I found a couple of ideas incorporating comprehension and some with vocabulary goals. So... I thought of combining it all, and making more up as I went, and instead of individual boards... um... making an OCEAN! Here's my crediting linkage. (Much thanks to Erin Schreiner, the author! I took her "Swimming through Comprehension" board and RAN with it!)


 I love interactivity. I arouses the mind and makes kids have fun learning. So... on eHow, I saw vocab words written down and each student as a fish swimming past these [goals]. OK. Only... we'd have each student as a fish and swim UP towards their goals in percentages (I still have to write the percentages... oopsie!)

And here's a little closer up... the percentage (of their goals) will be written on the seaweed to to the left of the chart. The different colored fishies here represent the different grades (so the students can find themselves easier). Please note... no one has moved up yet, because we're just starting the program and no one has been tested towards their goals this year.

Then we'll move onto the comprehension/theme side of things, entitled: What Does it all Mean? (how appropriate, right?)

And here, I separated the themes into the various grades...
With the titles of each of their themes... then I created a tissue paper "bubble", stapled laminated paper to it, so I could attach a current passage/story summary on each.

Then I added a passage/story summary...
The surrounding fish are laminated (so the Expo marker can be changed...) and written with either a vocabulary word or question related to the passage/story.
If you notice, they are stapled at the top and creased, so they fold up...
To reveal the definition (if a vocab word) or the answer!

As the stories change, so can our bulletin boards, without having to completely re-do them!

The same concept is done with the Math board... only these guys have googly-eyes, as their questions didn't take up so much room!
I'll incorporate more fish with questions and answers as we get beyond the previous year's review...

And then my favorite... the Island of Reading...
The cuts say "Journey", "Escape", "Dream", and "READ".

It's a work in progress, and I hope to get more fish shapes in there, but I'm on a time crunch and do have to work with the kids still, so there's really not much time for me to play with the boards, but... it's enough for Back-to-School night next week, so there we are.

I was trying to make a card earlier today, but it didn't turn out and still isn't turning out at this late hour (it's after midnight), so... this is action for today! Hopefully after hubby's vacation next week, I'll have time to figure out the dang moving card (the dimensions JUST were NOT working for me! and not letting it do what I thought it would do... ugh!).

But, in the meantime, please check out Ms. Tanya's blog, where all the other Design Team members have their work and links posted. Please be sure to give them some love, as you know... we all need it. And don't forget... you can join in the challenge, too! If you do, please be sure to leave me a link, so I can stop by and share some love, too!

Thanks for stopping by and sharing my simple pleasures with me. I appreciate it. and YOU have a wonderful Labor Day Weekend!

Thursday, August 16, 2012

First Day Back

I can't believe our summer is over! Here's the first day of school, which was yesterday... Doesn't she look bored already?

After school, we went and cooled of fat the movie theater to see STEP UP REVOLUTION. Fantastic dancing and awesome artistry! Then off to get a new outfit!

The day was over quickly, and thank goodness she loves her new teacher. She's our little Diva... well... the youngest Diva in the family...

Friday, September 9, 2011

Paper Hoarders Challenges! Back-to-School with a RULER Layout!

It's Paper Hoarders Design Team Day... and the Challenge? Back-to-School!!! Woohoo! Yes, the kids went back to school earlier last month, and I took time to take a pic. And since my Senior won't let me take one in front of the school anymore, I snatched this pic while she was in the car about ready to step out. Unfortunately, it didn't make it into the layout, as... if you know about my incident with Walgreens last time (if you don't, you can read about it HERE), I sent away for MAILED pics... Snapfish is my friend this week (hopefully!), and they are on the way.

So, anywho... the challenge had to be back to school and contain a ruler. Wow! I had ruler paper (Little Yellow Bicycle has a great line that has rulers in it...), I had ruler ribbon (dunno where THAT came from, but I have it!), had some stamps (woohoo!), and I had a GREAT FANTASTICAL embossing ruler border from ProvoCraft for the Cuttlebug. Can you guess which one I used? Ya think? Nooo! YESSSSS!

I did!

And I inked the "top" side with Tim Holtz Walnut Stain Distress Ink (because I love it SOOOO much!), and put in 1" strips of bright yellow paper, and ran it through my trusty CB. Woohoo! added some PopDots, raising the bar (ruler, of course!)...

Then I placed it around where the pic should go (when I get it!), Wrote on the top with chalk (lo-ove chalk!), cut out SCHOOL (designing on the Gypsy - S is Hannah Montana Rockstar, and the remaining letters are HM Daddy's Girl, welded the two O's together, because I'm cool like that!), Stickled the star, and glitter-glued the school (it was on craft cardstock...), glued it all down and added chalk exclamation points.

Then... I Stickled the inner star (from the "S"), Stickled the letters of the high school and "Seniors"... and wrote in WHITE gel pen the "Class of 2012". Easy peasy pudding and pie... it's so easy I made myself cry!

And I love it! I can't wait for the photo to come in and put the first page in her Senior Scrapbook! and just a little FYI... when I finally DO get that pic, I just might put a little bling-bling on her head in the form of a tiara... just thinkin'!

And ya know? um... I did this LAST week, because... (see the post here!), and I'm SOOOO glad I can finally share it with you!

Join in our super fun fun fun and go to Tanya's Blog, check out the LAYOUT DT's shtuffs and link up to participate in the challenge! Woohoo! And then... come back again NEXT week to see what more wonderful things we've all come up with!

Thursday, September 1, 2011

Paper Hoarders Design Team Challenge: Back-to-School (with a RULER)

Ok... so... the first post I did (which you WON'T see until next week) was a layout. And why won't you see it... yet? Because, I'm a total nerd/dork/goober, whatever you wanna call it and didn't even think that I couldn't make a layout. Why not? Because I am on the everything BUT a layout team. That team does it next week. Dweebie me! and so... I killed two birds in one night.

Throwing an idea together... I didn't want to do a card. Everyone was already doing cards, and I wanted to be a little different, plus... my fabulous idea (see next week's post!) kept glued to my head.

Now, bear with me, as Blogger won't seem to let me finish uploading photos, but if (I'll keep trying throughout the day!) it'll let me finish without kicking me out, they'll all be up before you know it.

And so... I ran from Back-to-School Night (at the high school), because yeah... we've been in school for 3 weeks now... to Walmart. Try to look for a wooden ruler there... NOT! because they just plain don't have any...

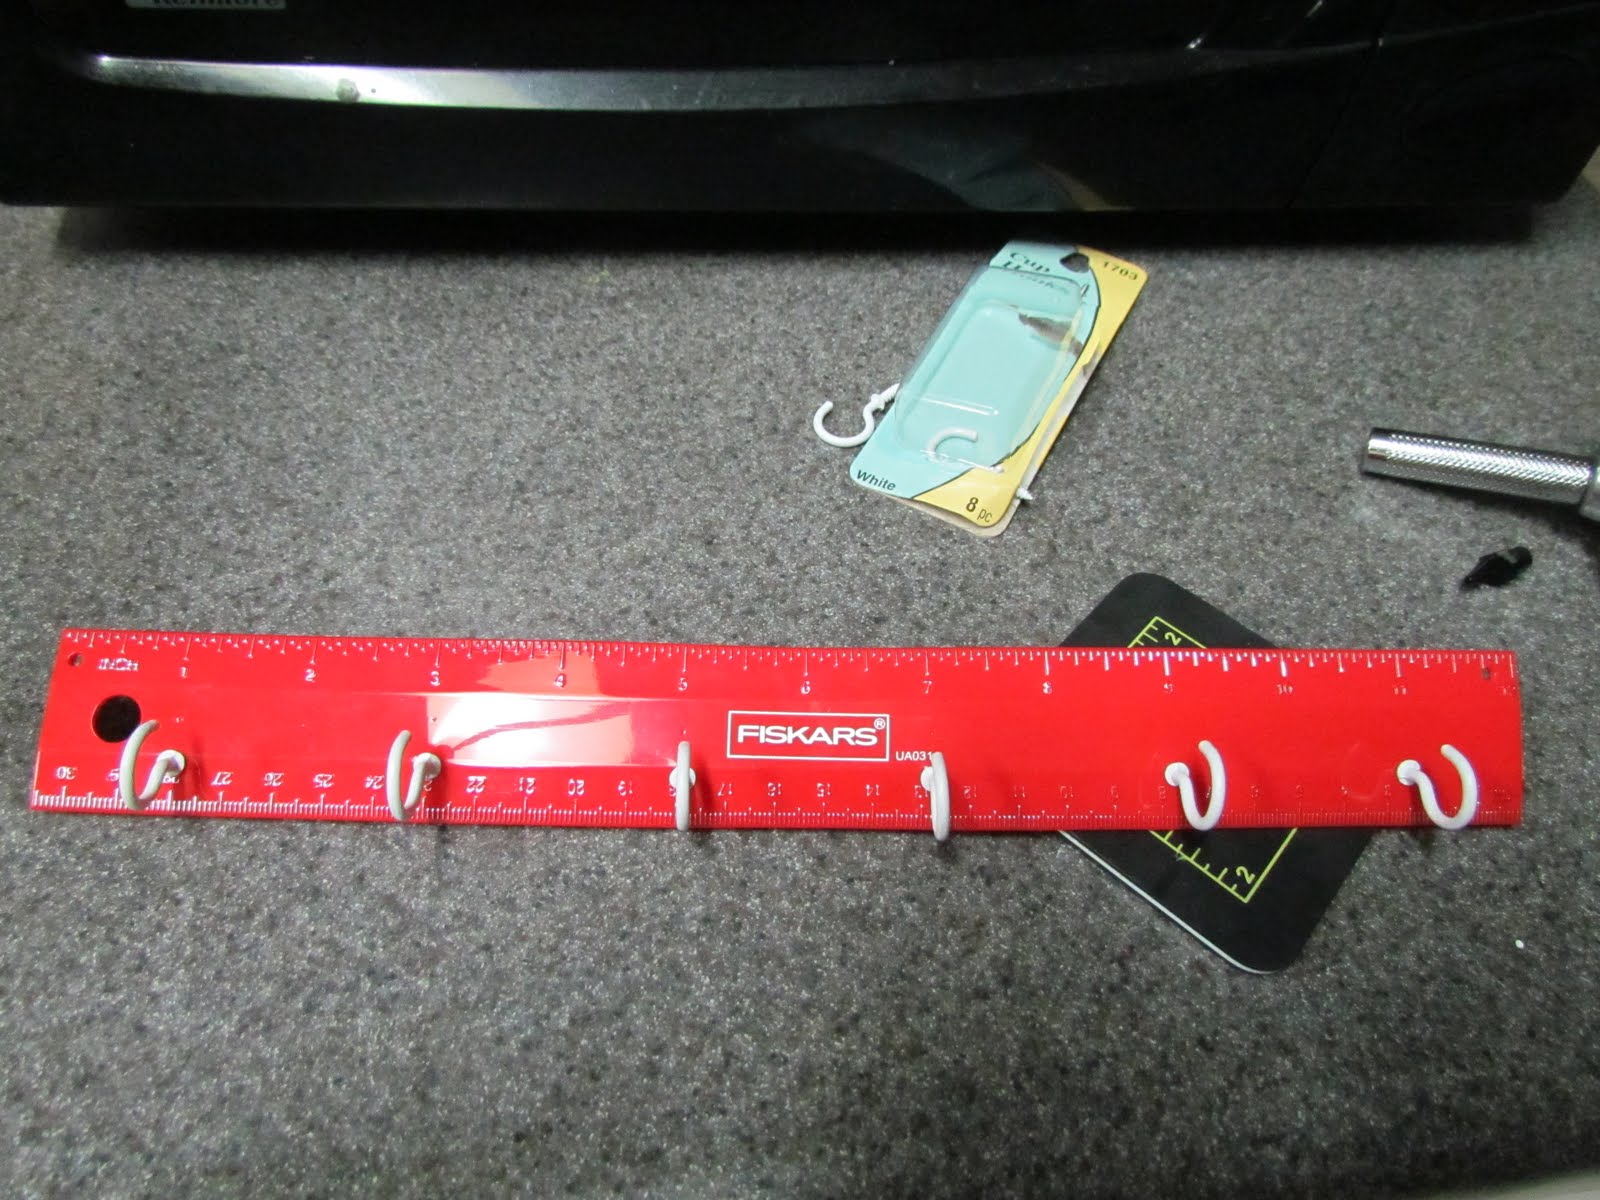
So... I got this super flimsy plastic ruler from Fiskars. Red, for the apples... I looked for green, but no such luck... WHY? Probably because that's what I'd set in my mind...
and I used my Silent Setter to punch holes in it. Teeny tiny holes so I could thread these white cup hooks in... (starting at the 1" mark and continuing at the odd inch marks... there's 6 in total)
Then I punched holes in the upper corners using my Big Bite!
See? and my husband said I needed to use a drill... um... I guess he doesn't understand MY kinda toys... uh, huh...

Threaded simple yellow ribbon through...

Cut out "WELCOME" in Plantin' School Book (in black card stock) and added a little chalky-chalky...

Added some black-backed (had to, on account a the ruler was already red... spoilin' ma plans!!!) red ripe shiny apples (used Colorbok shiny paper for these!) with a couple of little green leaves, and

Voila!

The teach now has an awesome little hanger for hall passes, office passes, keys, etc.

I'm sure she'll just love it! Hope you do, too!

And if you'd like to join in the fun-ee-oh!, swing by Miss Tanya's blog and she's got a little line-up going for you. Don't forget to do the challenge yourself... we all had fun doing it!

***Woohoo! The pics are all finally up... just a little add-on here...
To do the chalk letters, I kept them on an older mat and chalked them while still on the mat (after taking off the negative paper), makes it MUCH more easier.  Also, I realized I forgot to add that I cut a strip of craft paper, painted it blue, then the edges green and fastened it on in orange eyelets. Thank goodness the Big Bite goes through this stuff!!!