Friday, February 26, 2016

February LEAP Blog Hop

Welcome to the
http://scrapsbygracie.blogspot.com/.../02/leap-blog-hop.html
Have we got a hop challenge for you today.

Take the letters L-E-A-P and create any paper crafting project; a card, a scrapbook layout, a journal page, etc.

Here is the trick....whatever you make must use L-E-A-P in it somewhere.
For example:  A Lavender (L) card with Embossing (E) and Angled (A) with Prills (P).
Get it? So who is up to the LEAP challenge? Throw a frog into your project... and you've leaped right off the lily pad.

Now on with the projects...

So... when I think "LEAP," as my husband so often says... I'm a little stuck in the 80's. And way back then... I played a game called "Frogger." You may know it... It was a fun video game where you ribbit ribbit the little frog (and yeah... he was cute! about as cute as any digitized little guy could be!) across a river on logs and lily pads... then... as you advance to other levels... across a crazy freeway, hoping the little frog you! don't go... SPLAT! at least it wasn't graphic... although that might be really popular in today's world (and even I might like it, too!). So... I went with a Frogger-themed card.

My design (in Design Space):
"What's that lacey thing?" you ask? HA! That's my first part of LEAP! Lace. Woohoo! So glad you and are on the same page... The lace reminds me of waves... like in a pond... or a river... or on the Frogger video game. Yes... older people played and still play video games.
 
The double-round is... of course... the card. And we have our little friend there, as well.
The cardstock is my LEAP. Eggshell... Yep. I know... kinda stretching it... DEAL. Did you ever notice (or do you notice now...) the embossing lines done by Cricut don't align quite right? Next time... I'll probably "contour-hide" the line and do it myself. Because... otherwise, it ends up like THIS:
A little a lot off. And I'm not wild about that... But... believe it or not, I didn't have any Eggshell paper left. And so... I dealt with it. I hope you can, too!
And the Cricut began cutting the lace... Obviously then, I was going to have some time.
I misted the card in a watery-looking teal'ish. (Love that splattered look... Rustic... like the look of Nature, itself.)
And the lace was STILL being cut...
OMG! Seriously? This is taking F-O-R-E-V-E-R!
Will it NEVER stop? (This is at about 15-20 minutes'ish...)
A-ha! But look what I found in my stash... during my enormously long wait. Thank you, Christy Tomlinson...
So I used that beauty for a mask. And placed it... then went over it in a darker blue.
Oooh! Such a pretty Batik-looking pattern!
Mmmm... Mama likey...
But guess what? The Cricut FINALLY finished cutting. And I really liked this...
Look how intricate... Just poke all that out and we'll be good. I'll wait for you. I've already waited a long time... Don't worry... the bottle is almost gone.
Remember how I said I liked it? So... I flipped the card over... misted THAT side with the teal-ish...
Placed the homemade mask over and... CRAP!!!! I forgot to tell you what my LEAP was...
Airbrushing! When I went over it in a darker blue... those were Spectrum Noir pens. Beautiful but they appear to dry out kinda fast. I still have to call Customer Service on all that... And I will. Just a bit busy lately with other dramatic to-do's that require my attention...
And so you know... I took what Design Space gave me and moved it around on the mat (at the cutting stage) to fit where I had spaces on my scrap stash.
What's LEAP? uh... HELLO! Don't you see that Pink and Pearly smile?
I put him on both sides of the card (remember... I did both sides...) to see which one I liked more. My homemade side won. I'm probably a tad biased... Sorry, Christy!
Then I wrote with a thin glue... Making it into an '80's birthday card, because yeah... the '80's were great! and sprinkled it with GLITTER!
Now... it's quietly waiting in my card stash for an old friend (from my '80's days) to have a BIRTHDAY!
On the other "UP" side, I absolutely love this new embellishment created by the masking...
 
Up next is Anna! Be sure to LEAP to her blog next!

Today's hop is kindly sponsored by
who is generously giving away a class of the winner's choice. Be sure to comment on each blog on the hop by Friday, March 4th to be entered. Winner will be posted on Theresa's blog on Saturday March 5th.

Here's today's line-up in case you get lost along the way!

Theresa ~ http://scrapsbygracie.blogspot.com
Card A Day Challenge Blog DT ~ http://cardadaychallenge.blogspot.com
Kim ~ www.katydidcards.com
Sharon ~ http://piece-ofheart.blogspot.com
Amanda ~ http://salnclts76.blogspot.com
Alicia ~ http://goldengoddessdesigns.blogspot.com
Holli ~ Sunflowerholli.blogspot.com
Connie ~ http://conniecancrop.blogspot.com
Lisa ~ http://lisaslittlerascals.blogspot.com
Anna - http://grumpygrandmacreations.blogspot.com
Rhonda ~ craftingwithblue.blogspot.com

Friday, February 19, 2016

Black Tie Affair Blog Hop

http://conniecancrop.blogspot.com/
 Welcome to the Black Tie Affair Blog Hop
We are so delighted you are joining us for this very formal occasion where we will be showcasing projects with class, from weddings to homecoming dances.

 Connie Can Crop (that's me) is the first stop in this hop. This is a one day blog hop and we appreciate your leaving a comment for all of these amazing crafters. 

We have an amazing sponsor this month!!
 
http://www.3dsvg.com/
 
One lucky winner will win a $20 gift card to shop their awesome files in their shop! 
Be sure to check out their shop online HERE
Visit them on facebook HERE

What do you need to do to win? Easy... become  a follower of each of the fabulous blogs in this hop and leave each of them a comment letting them know what you like best about their projects.

You will have until 10 pm Sunday to finish the hop and leave your comments.

Winner will be announced on Wednesday 2/24/16 here at Connie Can Crop.

Be sure to follow everyone and leave a comment along the way!

Okey dokey. Here I am! With... GUESS WHAT?!? Another Project!!! Woohoo!!! And even though I'm not a real fancy-pants and don't like to dress up...  You can always look at other "fancy" black-tie stuff I've done!
 
Now... I know you might all get tired of my distressing out on everything, but just so you know... It's here to stay! However... the Chevron trend HAS GOT TO GO! I used Distress Inks, Stickles, the Cricut Explore Air, and all the stuff I love so much again! What a flippin' shock, right?
 
Designing things... it's fun. And so I wanted a night of magic. Magic Night. I was thinking "Puttin' on the Ritz". And I'm totally not apologizing or anything if you can't get that song out of your head now. Deal. Top hats... Canes... Glitter... Glitz. "Puttin' on the Ritz!" Yes... I love '80's music!!!!
 
I placed the top hat cuts , the bands, the bowties and the buttons all on a grey card that I had distressed with a darker grey. Then Stickle-d the **** of them! lol! I love Stickles!
Be sure if a big ol' glob comes out, use a paint brush to smooth it all down. Heck! Use a paint brush anyway to make it all Even Stevens.
I used a craft knife to scrape up the excess... the best I could. Forgive the blurry pics... I totally don't know what came over me!
And again, I Stickle-d the letters on while they were still on my mat... Just to make my life (and crafting a tad easier). It works. Just be sure it's all dry and all before you try to peel it up and it comes off/tears off in a pulpy mess!
And... just another note... before you or I go over the glued-down stuffs with clear plastic (like I've done before...) make sure the Stickles have dried.
I love magic. And the Cricut, Stickles, and glue make it all magical! Donchya think?
 Up next is Michelle

Here's our line up in case you get lost.

 
Want another chance to win!! Enter the monthly challenge at Connie Can Crop!!
You could win $50 to spend at Dreaming Tree!!

http://www.conniecancrop.blogspot.com/2016/02/monthly-challenge-43-i-do.html

Connie Can Crop Challenge #43
due 11:59 P.M. Monday, February 29th
Pacific Time

Friday, February 12, 2016

A Year of Card Techniques - (February) Ink Layering

http://scrapsbygracie.blogspot.com/2015/12/a-year-of-card-techniques-february-blog.html
It's month two of our year long adventure into different card-making techniques,
folds and paper crafting products. Join us the second Saturday of each month in 2016
for a new hop filled with great cards.

This month we will be focusing on ink layering techniques and OMGosh have we got
some cool cards for you. We really love feedback so please leave a comment on each of the
blogs in today's hop. Each comment on the 12 hops throughout the year will be entered
into a prize drawing for a $25 Blitsy.com gift certificate at the end of the year.

Don't worry, if you missed January's hop, you can still hop and comment by starting HERE.

Now on with the projects.

So... I had a textured base, that I thought would look good, to go plaid, via stripes. Did you follow all that? Because I'm not so sure I did, on the read back. But... if you read on, you might get it.
Here's the stripes the rubber stamp, not the full-blown mess in the background...
So I stamped them horizontally with Versamark Cloud White.
Then I went vertical... and dried it a tad.
Here's the dried version. I can see it? Can you?
Then I tried like the vids I watched and stamped over... in a dye ink red and a black.
That plaid didn't turn out the way I was hoping, so... My 11-yo wanted to help. I let her choose the background, the colors, etc.
And I rolled with it... FYI, DO NOT ROLL BACK ON A ROLLER STAMP, you'll end up with duplicate printing that doesn't look so hot.
Then I stamped over it (with dye inks again) in a bunch of different shades and tones of red.
The 11yo wanted a cutesy stamp, too... And so I did and I added a message... because I'm going to give it to the 11yo.
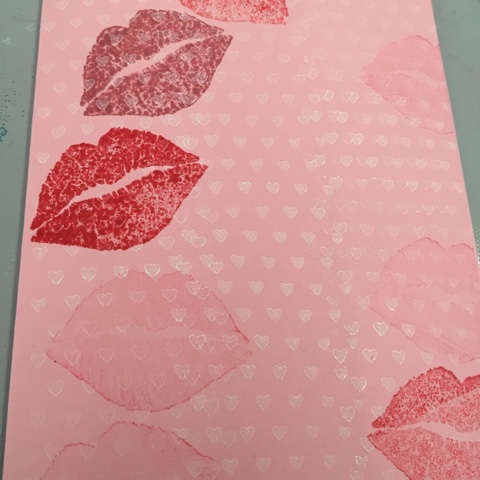
But... I wasn't quite happy with it, so I went back to the plaid. And I stamped white lips don't take that as an anti-PC remark... I really did use white ink. But you can't see them...
And then I layered juicy red lips on top (dye ink again!). If you look SUPER close, you can see the red and black stripes overlapping the white and becoming a different hue...
So... I'm not quite sure I like it. I would totally play with this technique more. It's kinda fun! But this card, I'll give to the hubster (this Sunday...). It'll all be good. He won't notice anything. Have a HAPPY VALENTINE'S DAY!

I'm the tail-end today. But... feel free to see if there's any blogs you might've missed, or if you'd like to re-review, start back at the top with Theresa (our host!).

And here's the, in case you want to do just that!

Theresa <===== Where all the fun starts!
Kim
Claudia
Denise
Debbie
Sharon
Lisa <====== THE END!
 

Thursday, February 11, 2016

Angela's Birthday Blog Hop

http://www.crazy3monkeys.blogspot.com/
Welcome to Angela’s Birthday Hop! So glad you can join us! 14 super crafty girls would like to share with you their birthday creations. Hopefully this will give you all some inspiration to make something for that upcoming birthday!

If you came from Shawnee, then your in the right spot! If not, please start at the beginning at Angela's!
...
For today's hop, Angela is giving away a fun birthday package! All you have to do to win is like and comment all 14 of us!
The photo wouldn't save here for some oddball Blogger reason, so for this moment only, please use your imagination. This is the blingy birthday package she has up for the winner!
Jaded Blossom Birthday Splatter Stamp
Recollections rhinestone embellishment
Recollections purple burlap
Basic Grey 6x6 Shine On paper pack
Mon Ami Gabby diamond mesh

Angela is a very creative lady. I often "hop" with her... Never met her in person, but I suspect she's a pretty cool gal in real life. So, when she decided to host a Birthday Hop, I asked if I could join in! And... here we go!

Angela's blog is creatively called 3*Crazy*Monkeys... so what better of a bday card for the bday girl than a little monkey business?!? Here's a little cut... I moved the bits about at the mat point, so it would fill in the spaces of some scrap paper I had... (these little guys were originally put together by the program).
See the gaps I had to fill? Yes... I save every. flippin'. scrap. of. paper.

Ok... so I didn't realize until I'd gotten here, but it's flipped a bit. Get over it. See how well it's all filled in? Use those scraps! Save a tree or part of one! Oh my... we need some color here...
The cut (from the Cricut) only has one monkey... but uh... she's got three... so I obliged.
And here... a totally non-PC song was going through my head (to the tune of "3 Little Indians"... You know... that song that's "not" allowed anymore in kindergarten? One Little...
... Two Little...
... Three Little Monkeys...
They're so cute! See how I mad them kinda sorta hold hands? You know... Like all good siblings do...
Wow. I don't like it. It has to go! But I did leave the pretty vellum piece on the back...
*Note to self* Darkness can't be worked in. Be sure to move about the craft room on a regular basis. You know there is a timer on a motion-sensor light. Because your handy dandy husband didn't want you to leave the craft room light on all the time. and THIS could happen...
I water-colored the vine. Next time... I'd do that first!
Added some Stickles, slapped down the sentiment piece... and there we have it!

I'm the last bit in the line of wonderful crafters for this hop, but if you missed anyone, feel free to hop to where you missed or start at the beginning with Ms. Angela! Hope you had a good time (and hope Angela has an AWESOME Birthday!). Please don't forget to leave a comment...

Here's the full lineup:
Angela (The Birthday Girl! - be sure to wish her a Happy Birthday, when you stop by!)
Daphne
Shawnee

Me! <==== You are here!

Monday, February 8, 2016

Guest Designer at Connie Can Crop: February Challenge - I Do! (Wedding or Blingy... You Choose!)

So... I'm having a Virgin moment... I am a first-time VIRGIN! guest designer over at Connie Can Crop. and just so you know... I'm her first, too! So... does that mean we had a double-virgin? I'll take that with sugar on the rim, no salt please. Trying to watch my sodium intake in my margaritas nowadays.
http://conniecancrop.blogspot.com
Connie does a monthly challenge, and February's challenge is "I Do!" We were to do something either wedding themed get it? "I Do!"? duh... but me? I had invitations to make. My youngest kiddo turned 11 at the very end of January, but circumstances never allow us to have a party for her that particular weekend. So... we usually do something the day before Super Bowl never on SuperBowl Sunday; that would be totally un-American! This year, she wanted to have a roller-skating party. And so... we did. I was a tad late on the invites, as I was having slight difficulties which turned out to be user/interpreter error: read: I was reading it all wrong! and had to get those resolved on the Brother front.
 
Moving on... First thing's first. Had to design a skating boot. Way back in the day, when I did a set of these, I truly did design my own. Nifty Fifties (by Cricut) wasn't out yet (that's where I got the skate/boot!). I created a skate and boot from a hiking boot (from a camping cartridge, I think) and added circles (wheels!). lol. But... with the Cricut Explore Air (and the subscription), there are so many more possibilities and less work, which makes more time for me to play! and I found he perfect one.
 
I cut everything out individually... and inked or colored or Gelato'ed it all while on the mat(s). Heck ya! I had to make 15 of these babies, and I wasn't about to put them all individually down and ink them to have them slide all over the place. Remember, the mats are sticky. Things stay in place. DO NOT TAKE THE NEGATIVE PAPER (IOW: Don't weed out your design!) BEFORE INKING OR COLORING. You don't want to get the mat dirty with your colors and potentially take away the "stick."
and if you're looking at the dates I have written down on each mat, I date everything. Just so I know how long something lasted. (It's an OCD-analytical-mind thing. And it works for me. Don't judge.
Those Gelatos go on SOOOO smooth. I just love them. The pics look a tad yellowish, but trust me. That is white.
On to the Brother Scan N Cut 2. I love this machine. (Love the Explore Air, too! I'm giving love to almost all my machines today... I handwrote this... scanned it, and cut it. Then I did it all over again, because the OCD in me didn't like the separation of the "Skate" and "Celebrate". It left WAY too much space between and didn't feel like a full element to me. Yes, I'm a slight perfectionist with flaws. I love for things to be homemade and have a slight imperfection, but the imperfection that of my choosing.

So... like I said. I did it again. and copied it. and copied it. and copied it. and copied it... you get the picture, right? I copied it 11 times, to get 12 total. I tried to copy it on the machine itself, but it separates out the writing from the background. IOW... I couldn't figure out the dang thing, so I gave up and did it a way I could figure out, as I was spending WAY too much time trying to figure it out.
And just so you know... this would scan into the Brother... but wouldn't save. It said there was "too much of a pattern." So, I kept trying... by taking out one pattern piece at a time. It would finally save at 8 pattern pieces. And this... is the final cut. YAY!
See how delicate and detailed it is? So cool!
And after all the layers (of the skate and boot), this is what we've got...
Super lovin' it! I'm not a pink person... but my kid is. And she wanted super glitter, too... but I decided against it, as she was inviting boys, too... and these boys aren't the glittery kind.
But me and the OCD just needed something else... it was missing... Wink of Stella on the snowflakes! And so... I obliged. Still totally loving the stuff and getting the hang of it so much easier! and yes... I finally bought the full-color pack! Can't wait to play with all that.
And... the final invitation in all it's glittered glory.
And the whole lot of them. Because you know I love my kid.
You can see... In my own way, I said, "I Do!" to my kid. And "I DID!" her invitations. Haha! I'd totally do it again. She loves them... and so did everyone else.
 
The party? Yep. It was great. Only a few knew how to skate at the beginning, but by the end... no one wanted to leave. I think it's a keeper!
 
Thanks for visiting. I sure hope you enjoyed the Virgin Territory my Guest Designer Stint. Please don't forget to visit Connie Can Crop and check on her other designers. She always has lots of fabulous people doing fabulous things. Feel free (and you know you're appreciated) to comment at the bottom. I always love to hear from you! Enjoy your day, and think about what YOU say, "I Do!" to!